Deploy Airy with Helm
Deploy Airy with Helm, on an existing Kubernetes cluster.
The goal of this document is to provide an overview of how to run Airy Core in an already existing Kubernetes cluster Helm.
Prerequisites
Kubernetes
You would need an existing Kubernetes cluster and administrative access to it. The size of the cluster depends on the number of connected sources and the number of messages flowing through the Airy Core platform. It is important that the pods are running stable and that they are not restarting. You can start with a simple setup of two nodes, each of them with 4 vCPUs and 8GB RAM. After that you can add or remove computing resources, so that the cluster is not under or over provisioned.
In case you are not sure how to create a Kubernetes cluster, here is a small guide on setting up Kubernetes in different environments:
- Azure
- DigitalOcean
- Minikube
- AWS
For creating a Kubernetes cluster in Google, you can use either the Google cloud dashboard or the gcloud command line tool which is part of the Google SDK.
After you install the Google SDK and you have setup your Google account, you can create a Kubernetes cluster with one command:
gcloud container clusters create awesomechat --num-nodes=2 --machine-type=e2-standard-4
The command will also update your kubeconfig file.
For more information refer to the official Google Guide
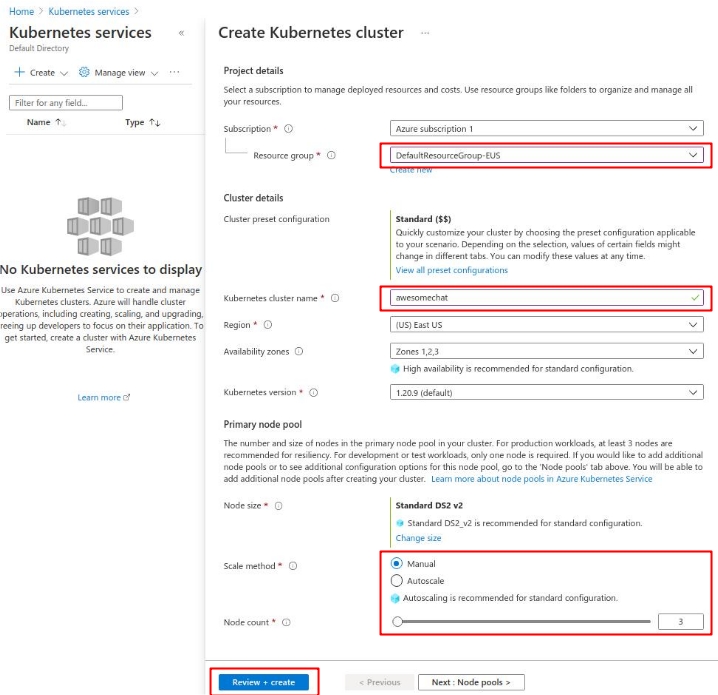
For creating a Kubernetes cluster on Microsoft Azure, you can use the Microsoft Azure Portal, the Azure PowerShell utility or the Azure CLI.
The simplest way to create the cluster is using the Microsoft Azure Portal. Navigate to the Kubernetes services dashboard and click on Create -> Create a Kubernetes cluster.
On the following screen make sure that you:
- Select the default resource group or create a new one.
- Fill in the name of the cluster (ex. awesomechat).
- Select the number of nodes.
After the cluster is created, you can use the az Azure CLI to setup access to the cluster:
az login
az aks list
az aks get-credentials --resource-group DefaultResourceGroup-EUS --name awesomechat
The last command will update your kubeconfig file with the proper credentials.
For more information refer to the official Microsoft Guide.
A Kubernetes cluster can be created directly on the DigitalOcean dashboard by clicking Create -> Kubernetes. You can leave all the options default, except for the Node plan as the default nodes might be too small for running the Airy Core platform.
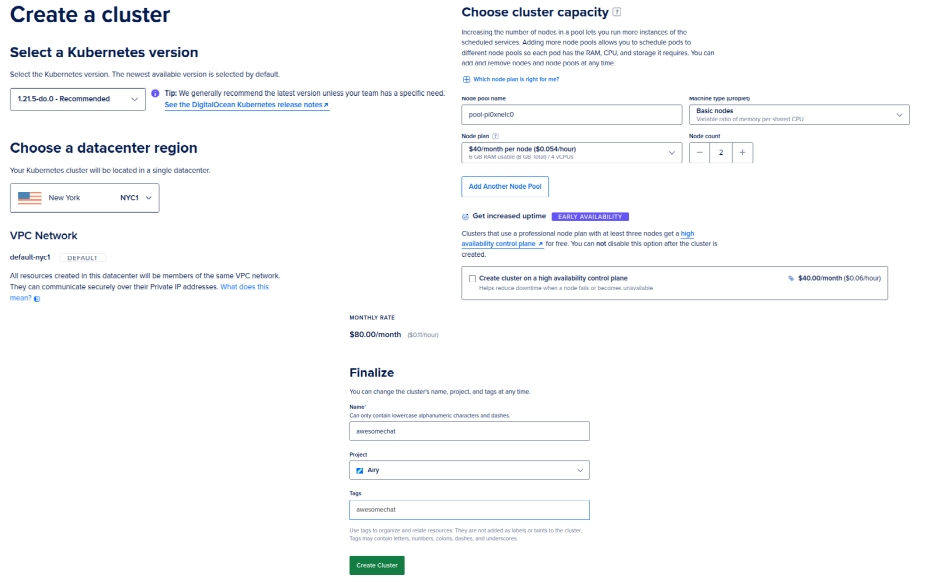
After you create the cluster you need to go through a short guided cluster setup.
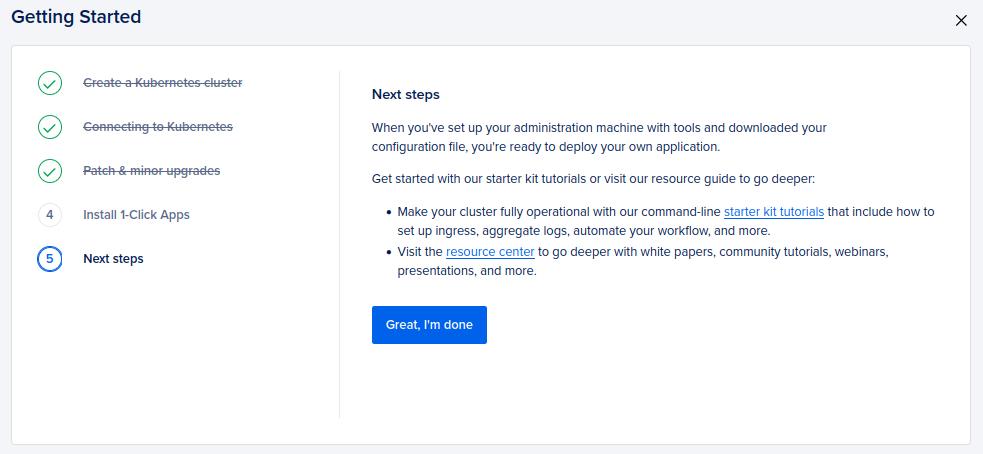
After you complete the setup you can Download Config File to save the kubeconfig file to your machine. With the kubeconfig file you can now access the kubernetes cluster.
kubectl --kubeconfig ./awesomechat-kubeconfig.yaml get pods
For more information refer to the official DigitalOcean Guide
Airy Core can be created on Minikube with predefined settings, using the Airy CLI. However, if you want to create your custom Minikube instance, for example with custom settings for CPU and RAM, you can also do that with the Minikube utility:
minikube -p airy start --driver=docker --cpus=4 --memory=7168 --container-runtime=containerd --ports=80:80 --extra-config=apiserver.service-node-port-range=1-65535
The apiserver.service-node-port-range settings is needed if you want to use port 80 on the Minikube VM as the NodePort for the ingress controller service.
For more information refer to the official Minikube Documentation.
Airy Core can be created on AWS using the Airy CLI. However that approach doesn't allow you to customize parameters other then the vpcId and instanceType. To be fully in control of the creation of the Kubernetes cluster on AWS you can use create one using the AWS Console or the AWS CLI.
For creating a cluster you first need an AWS IAM Role and a VPC. Export your profile and your region:
export AWS_PROFILE=my-aws-profile
export AWS_REGION=my-aws-region
Create a new AWS IAM Role and attach the appropriate policies:
export POLICY='{"Version": "2012-10-17","Statement": [{"Effect": "Allow","Principal": {"Service": "eks.amazonaws.com"},"Action": "sts:AssumeRole"}]}'
aws iam create-role --role-name awesomechat --assume-role-policy-document "$POLICY"
aws iam attach-role-policy --role-name awesomechat --policy-arn \
  "arn:aws:iam::aws:policy/AmazonEKSClusterPolicy"
aws iam attach-role-policy --role-name awesomechat --policy-arn \
  "arn:aws:iam::aws:policy/AmazonEKSWorkerNodePolicy"
aws iam attach-role-policy --role-name awesomechat --policy-arn \
  "arn:aws:iam::aws:policy/AmazonEC2ContainerRegistryReadOnly"
aws iam attach-role-policy --role-name awesomechat --policy-arn \
  "arn:aws:iam::aws:policy/AmazonEKS_CNI_Policy"
ROLE_ARN=$(aws iam get-role --role-name awesomechat --query 'Role.Arn' --output text)
Get the default VPC and the public subnets:
VPC_ID=$(aws ec2 describe-vpcs --filters Name=is-default,Values=true --query 'Vpcs[0].VpcId' --output text)
SUBNETS=$(aws ec2 describe-subnets --filters Name=vpc-id,Values=${VPC_ID} \
  --query 'Subnets[?MapPublicIpOnLaunch==`true`].SubnetId' --output text | sed 's/\t/,/g')
You can modify the list of subnets according to your needs, but you must have at least two subnets with the property MapPublicIpOnLaunch set to true.
Then create the Kubernetes cluster with the following command:
aws eks create-cluster --name awesomechat --role-arn ${ROLE_ARN} --resources-vpc-config subnetIds=${SUBNETS}
To update your kubeconfig file run:
aws eks update-kubeconfig --name awesomechat --alias awesomechat
For more information refer to the official AWS Guide.
Command line utilities
You will also need the Helm and Kubectl binaries, locally on your machine.
Install
Before you proceed with the Helm installation, make sure that you are connected to the correct Kubernetes cluster.
If you are not using your default kubeconfig file, you need to export an environment variable:
export KUBECONFIG=./kube.conf
Deploy Airy Core with the latest version. You can also configure a specific version.
helm repo add airy https://helm.airy.co
helm repo update
helm install airy airy/airy --timeout 10m
By default Airy Core creates only a HTTP listener and when running in cloud environment it is recommended to setup an encrypted connection.
Get the address of your LoadBalancer:
kubectl -n kube-system get service ingress-nginx-controller -o jsonpath='{.status.loadBalancer.ingress[0].*}{"\n"}'
Configure your DNS so that your desired hostname points to the IP address of LoadBalancer. In this example we will be using the hostname awesomechat.airy.co.
Create an airy.yaml file with the following configuration:
global:
  host: awesomechat.airy.co
  ingress:
    letsencrypt: true
ingress-controller:
  https: true
  letsencryptEmail: "mymail@myhostname.com"
The above suggested airy.yaml file works only for cloud installation. For Minikube installation the should be done by running the Airy CLI with --init-only or by running the default airy.yaml file shown below:
global:
  host: localhost
ingress-controller:
  ngrokEnabled: true
Run the following command to upgrade your Airy Core installation and setup Let's Encrypt:
helm upgrade airy airy/airy --values ./airy.yaml
After that you should be able to access your Airy Core instance through HTTPS, in this example on https://awesomechat.airy.co.
Customize
Deploying Airy Core with Helm gives flexibility to customize your installation.
Namespace
If you wish to deploy Airy Core to a separate namespace, you need to specify the --namespace flag to Helm.
helm install airy airy/airy --timeout 10m --namespace airy
Kafka
The default installation creates its own Kafka cluster. This section explains how to deploy Airy Core using an existing Kafka cluster:
The default settings in the Airy Core platform, on how to access the Kafka resources, can be overwritten in your airy.yaml file:
config:
  kafka:
    brokers: "kafka-headless:9092"
    zookeepers: "zookeeper:2181"
    schemaRegistryUrl: "http://schema-registry:8081"
    authJaas: "sasl authentication string" # optional
Run the following command to create the Airy platform without the bundled installation of Kafka, Zookeeper and the Schema registry.
helm install airy airy/airy --timeout 10m --set prerequisites.kafka.enabled=false --values ./airy.yaml
Confluent
To connect to a Kafka instance in Confluent cloud, settings the config.kafka.brokers and config.kafka.aurhJaas is enough, prior to deploying the Helm chart.
Aiven
Aiven cloud uses a keystore and truststore certificates that need to be loaded on the workloads that are connecting to Kafka. Get the necessary certificates and connection files from Aiven using the avn CLI and place them in a separate directory.
avn service user-kafka-java-creds {KAFKA_INSTANCE} --username {USERNAME} -d ./aiven/ --password {PASSWORD}
Create a Kubernetes ConfigMap that contains the contents of the created directory:
kubectl create configmap kafka-config-certs --from-file aiven/
Set the connection appropriate parameters in your airy.yaml file:
config:
  kafka:
    brokers: "the-aiven-kafka-broker-url"
    keyTrustSecret: "the-key-trust-secret"
Then install Airy with the following command:
helm install airy airy/airy --timeout 10m --set prerequisites.kafka.enabled=false --set global.kafkaCertAuth=true --values ./airy.yaml
Kafka partitions per topic
Currently all the default topics in the Airy instance are created with 10 partitions. To create these topics with a different number of partitions, add the following to your airy.yaml file before running helm install (before the initial creation of the topics):
provisioning:
  kafka:
    partitions: 2
Beanstalkd
The default installation creates its own Beanstalkd deployment, as it is a prerequisite for using the integration/webhook component.
Run the following command to create the Airy platform without the bundled Beanstalkd installation.
helm install airy airy/airy --timeout 10m --set prerequisites.beanstalkd.enabled=false --values ./airy.yaml
If you wish to omit both Beanstalkd and Kafka, you can use the following command:
helm install airy airy/airy --timeout 10m --set prerequisites.enabled=false --values ./airy.yaml
Ingress controller
The default installation creates its own NGinx Kubernetes ingress controller, in the kube-system namespace. If you prefer to use your own Kubernetes ingress controller, run the following command to create Airy without the bundled one:
helm install airy airy/airy --timeout 10m --set ingress-controller.enabled=false --values ./airy.yaml
The Airy platform comes with defined ingress resources. Feel free to customize them in accordance with your ingress controller.
For example to set a custom host parameter, run the following commands:
HOST="my-airy-core-fqdn"
for ingress in $(kubectl get ingress -l core.airy.co/managed=true -o jsonpath='{.items[*].metadata.name}'); do
  kubectl get ingress ${ingress} -o json | jq "(.spec.rules[0].host=\"${HOST}\")" | kubectl apply -f -
done
Charts
The resources for the Airy Helm chart are located under infrastructure/helm-chart. You can customize the charts and package or deploy the charts directly to your Kubernetes cluster.
As a reference you can use the script that we use to package and publish the Helm charts using Bazel, which is located under scripts/push-helm-charts.sh.
Container registry
If you wish to build the docker images yourself and store them in your own Container registry, you can overwrite the path of the container registry with the following command:
VERSION=$(curl -L -s https://airy-core-binaries.s3.amazonaws.com/stable.txt)
helm install airy airy/airy --timeout 10m --set global.containerRegistry=my-docker-registry
Workspace setup
When installing with Helm, a workspace directory is not created and therefore you cannot use the Airy CLI with your Airy Core installation, without setting up your workspace directory first. The Airy CLI is needed to apply configuration, to get the status of the components and to interact with the API.
In order for the CLI to recognize a workspace directory, you need to have two files there:
cli.yaml- Configuration on how the CLI can access the cluster.apihost- The loadBalancer or the hostname on which the API can be reached.kubeconfig- The path to the Kubernetes config file.contextname- The context for the cluster, inside the kubeconfig file.namespace- The namespace whereAiry Coreis installed.
airy.yaml- Values you used for deploying the Helm chart. The file can also be empty, but it needs to exist.
Example of the cli.yaml file.
apihost: https://my-airy-core-fqdn
contextname: gke_us-central1-c_awesomechat
kubeconfig: /home/user/.kube/config
namespace: default
The above suggested cli.yaml file works only for cloud installation. For Minikube installation the should be done by running the Airy CLI with --init-only or by running the default cli.yaml file shown below:
apihost: http://localhost
Upgrade
For upgrading your Airy Core instance using helm, refer to our upgrade document.
Troubleshooting
To view your existing Helm installation run helm list.
You can see the current revision number of your Helm deployment by running:
helm list --filter 'airy' -o json | jq .[].revision
If you wish to rollback to a previous installation, run:
helm rollback airy {VERSION_NUMBER}
where VERSION_NUMBER is a previous revision number of the airy helm chart.
If you need further help, refer to our Troubleshooting section.
Uninstall
For uninstalling your Airy Core instance using helm, run the following command:
helm uninstall airy
Uninstalling the Helm chart will not remove the data which is stored in Kafka. To remove all the volumes associated with Airy Core run the following commands:
kubectl delete pvc data-beanstalkd-0
kubectl delete pvc datadir-0-kafka-0
kubectl delete pvc datadir-zookeeper-0
kubectl delete pvc datalogdir-zookeeper-0
After this you also need to remove or destroy the created Kubernetes cluster, if one was created particularly for running the Airy platform.