Start interacting with 1 billion monthly active users on Instagram!
This document provides a step by step guide to connect an Instagram account with your Airy Core Platform instance.
- The required steps to configure the Instagram source
- How to connect an Instagram account to Airy Core
Make sure you have:
- An instagram account fulfilling Facebook's rollout criteria
- A Facebook Page connected to that account
- A registered Facebook app
To connect an instagram account we have to complete the following steps:
- Step 1: Find the App ID and Secret
- Step 2: Update the webhook integration
- Step 3: Enable the Instagram Graph API
- Step 4: Obtain the Page token
- Step 5: Get the Instagram account ID
- Step 6: Connect an Instagram channel
- Step 7: Send a message to Instagram
Step 1: Find the App ID and Secret
Assuming that you already have a registered app, you can find it listed under developers.facebook.com/apps.
On your application's dashboard, note down the App ID of your application and then head to theSettings > Basic page, where you will find your App Secret:
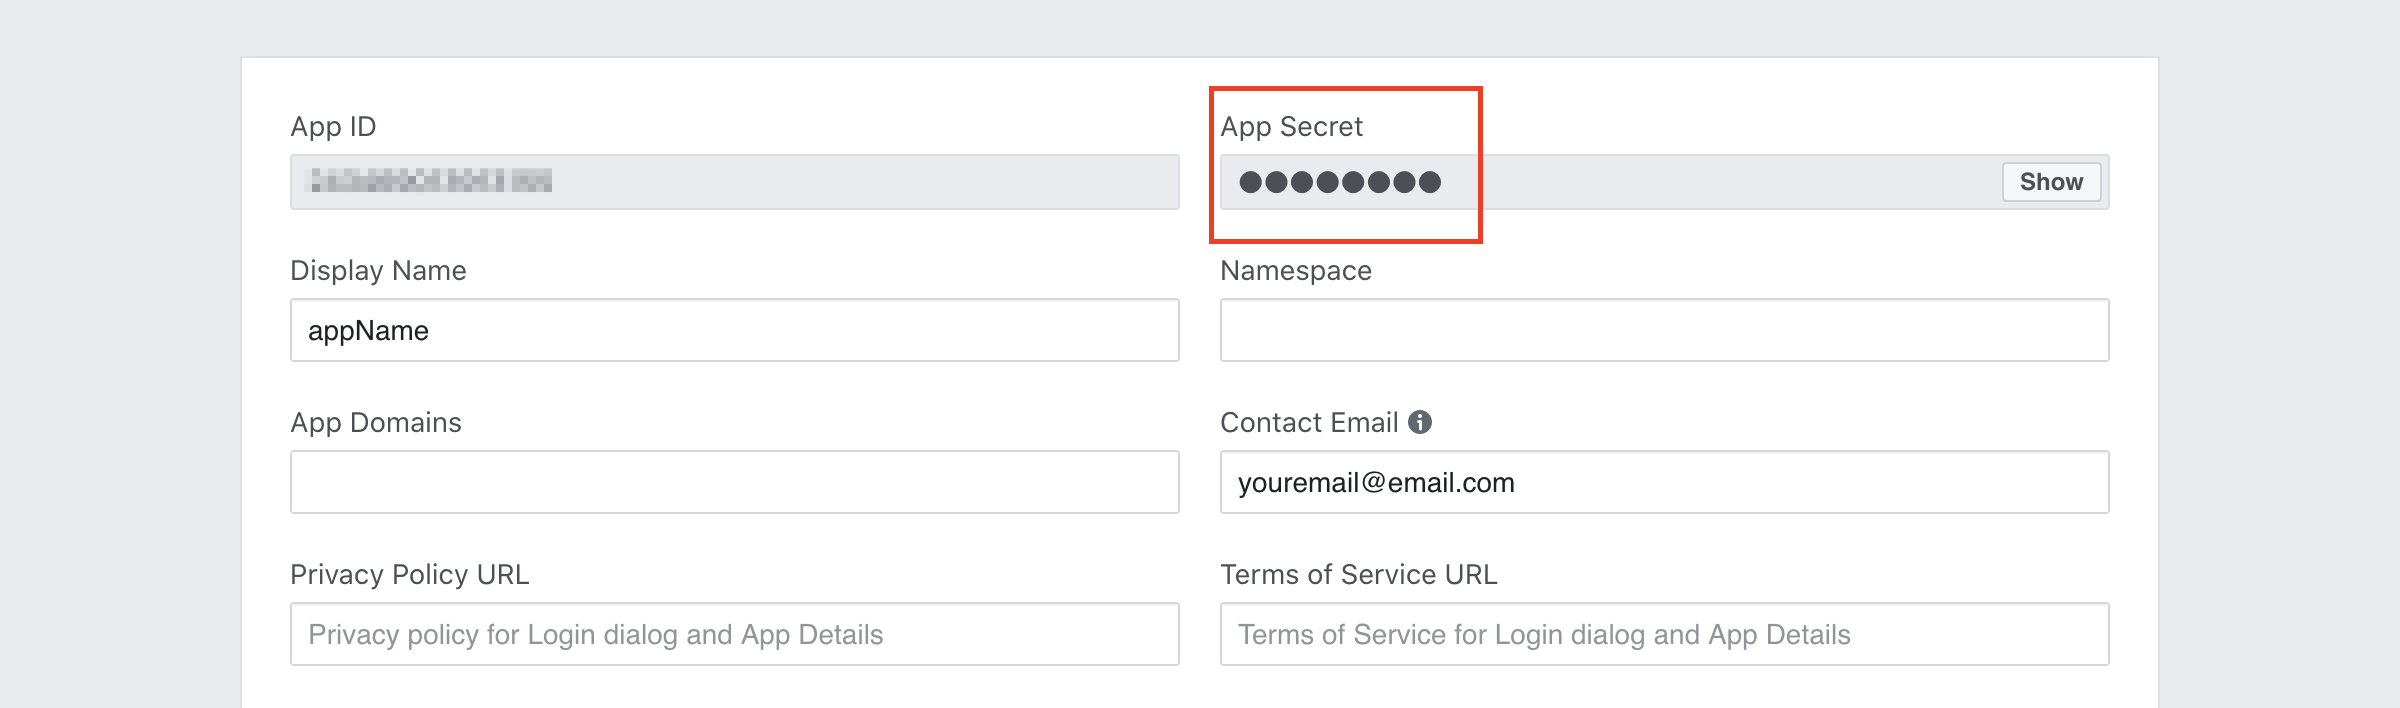
Copy and paste your App ID and App Secret as strings next to appId: and appSecret:, below components/sources/facebook in your airy.yaml file.
Refer to the Configuration Docs on how to input these values.
Step 2: Configure the webhook integration
Facebook must first verify your integration with a challenge to start sending events to your running instance. To verify your Facebook webhook integration, set the value next to webhookSecret:, below components/sources/facebook in your airy.yaml file, to a value of your choice.
You are now ready to configure the webhook integration. Click on the + icon next to "Products" on the left sidebar of your app's dashboard: scroll down, a list of products will appear.
Click on the button Set Up on the Webhooks product card.
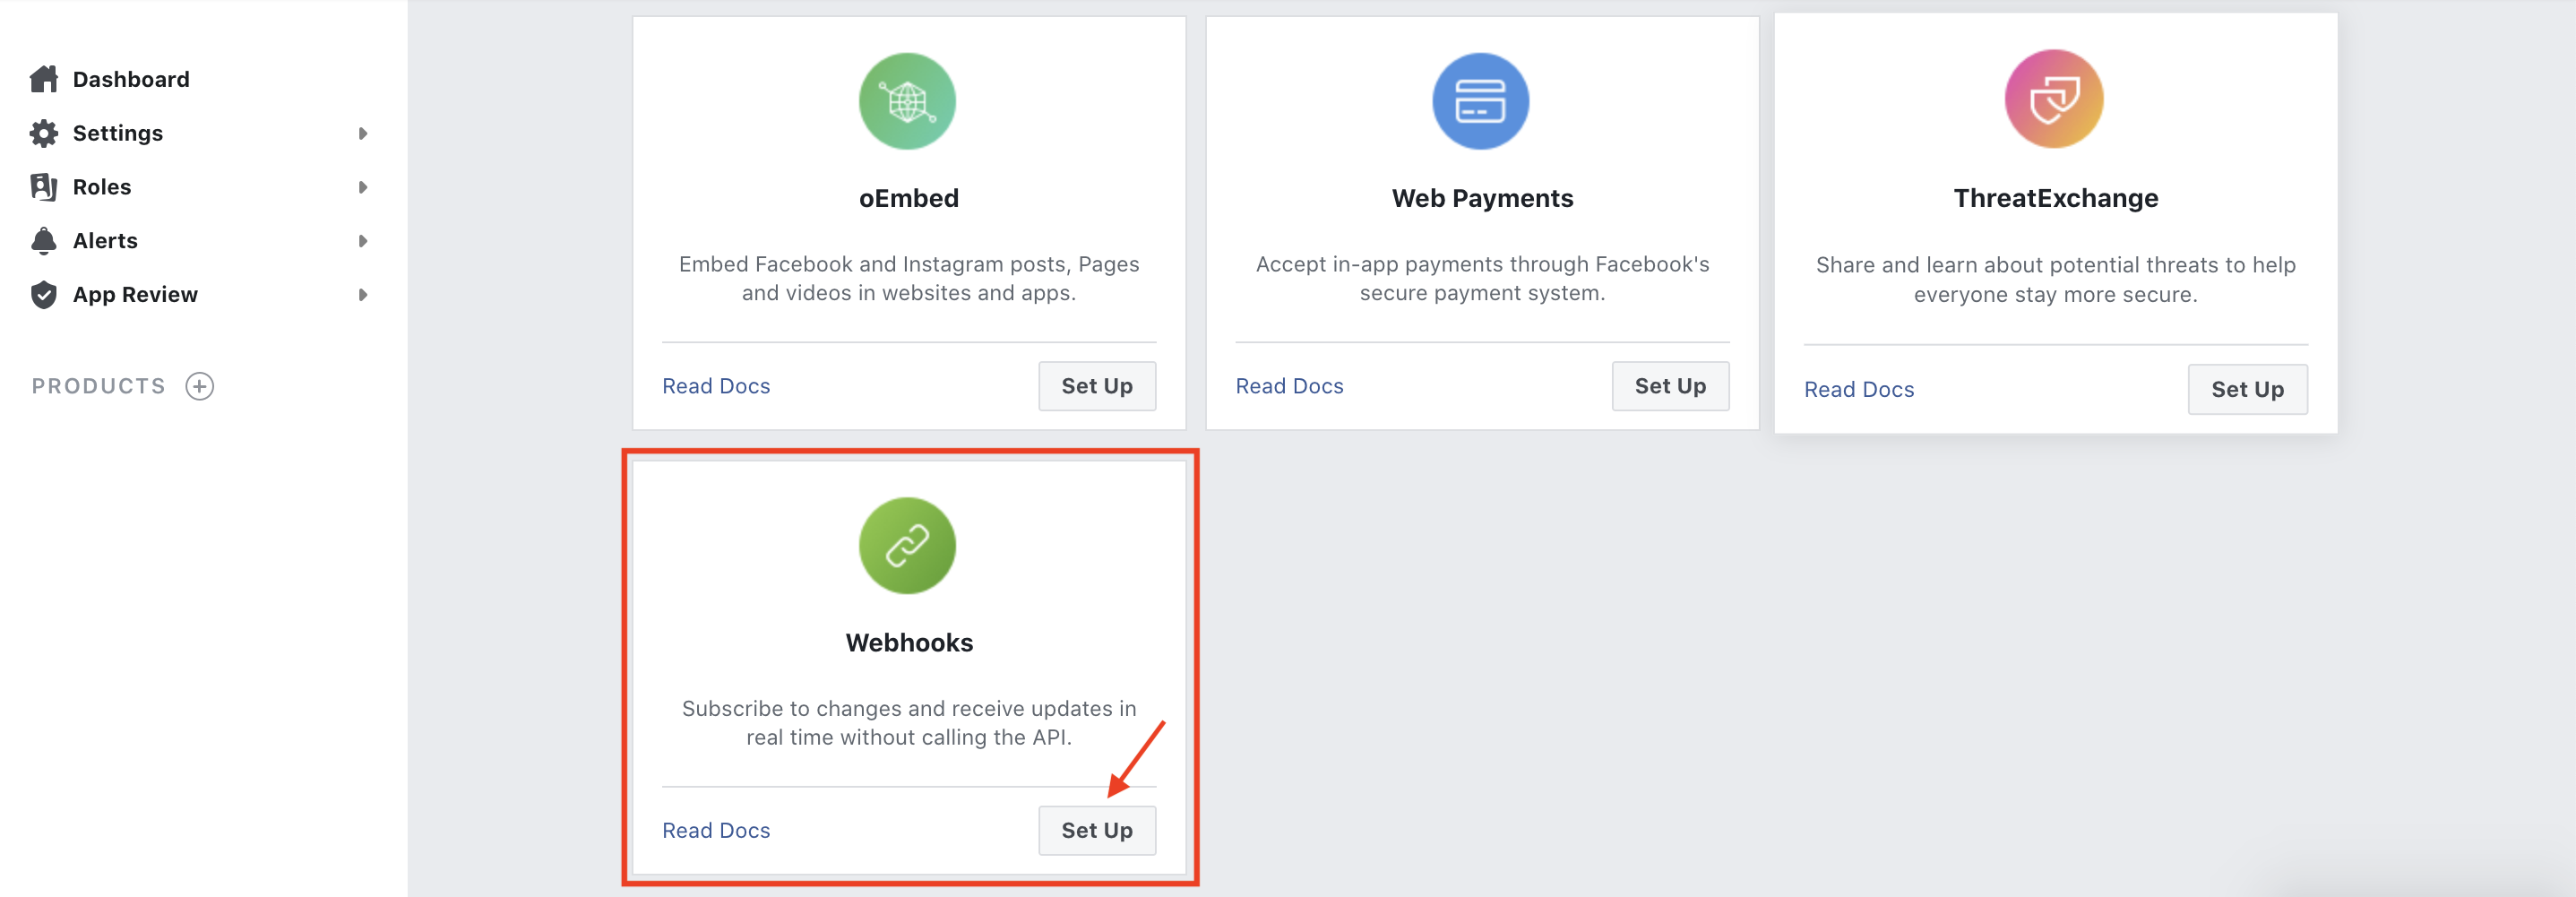
This will add the Webhooks as one of your app's products and will lead you to the Webhooks product page.
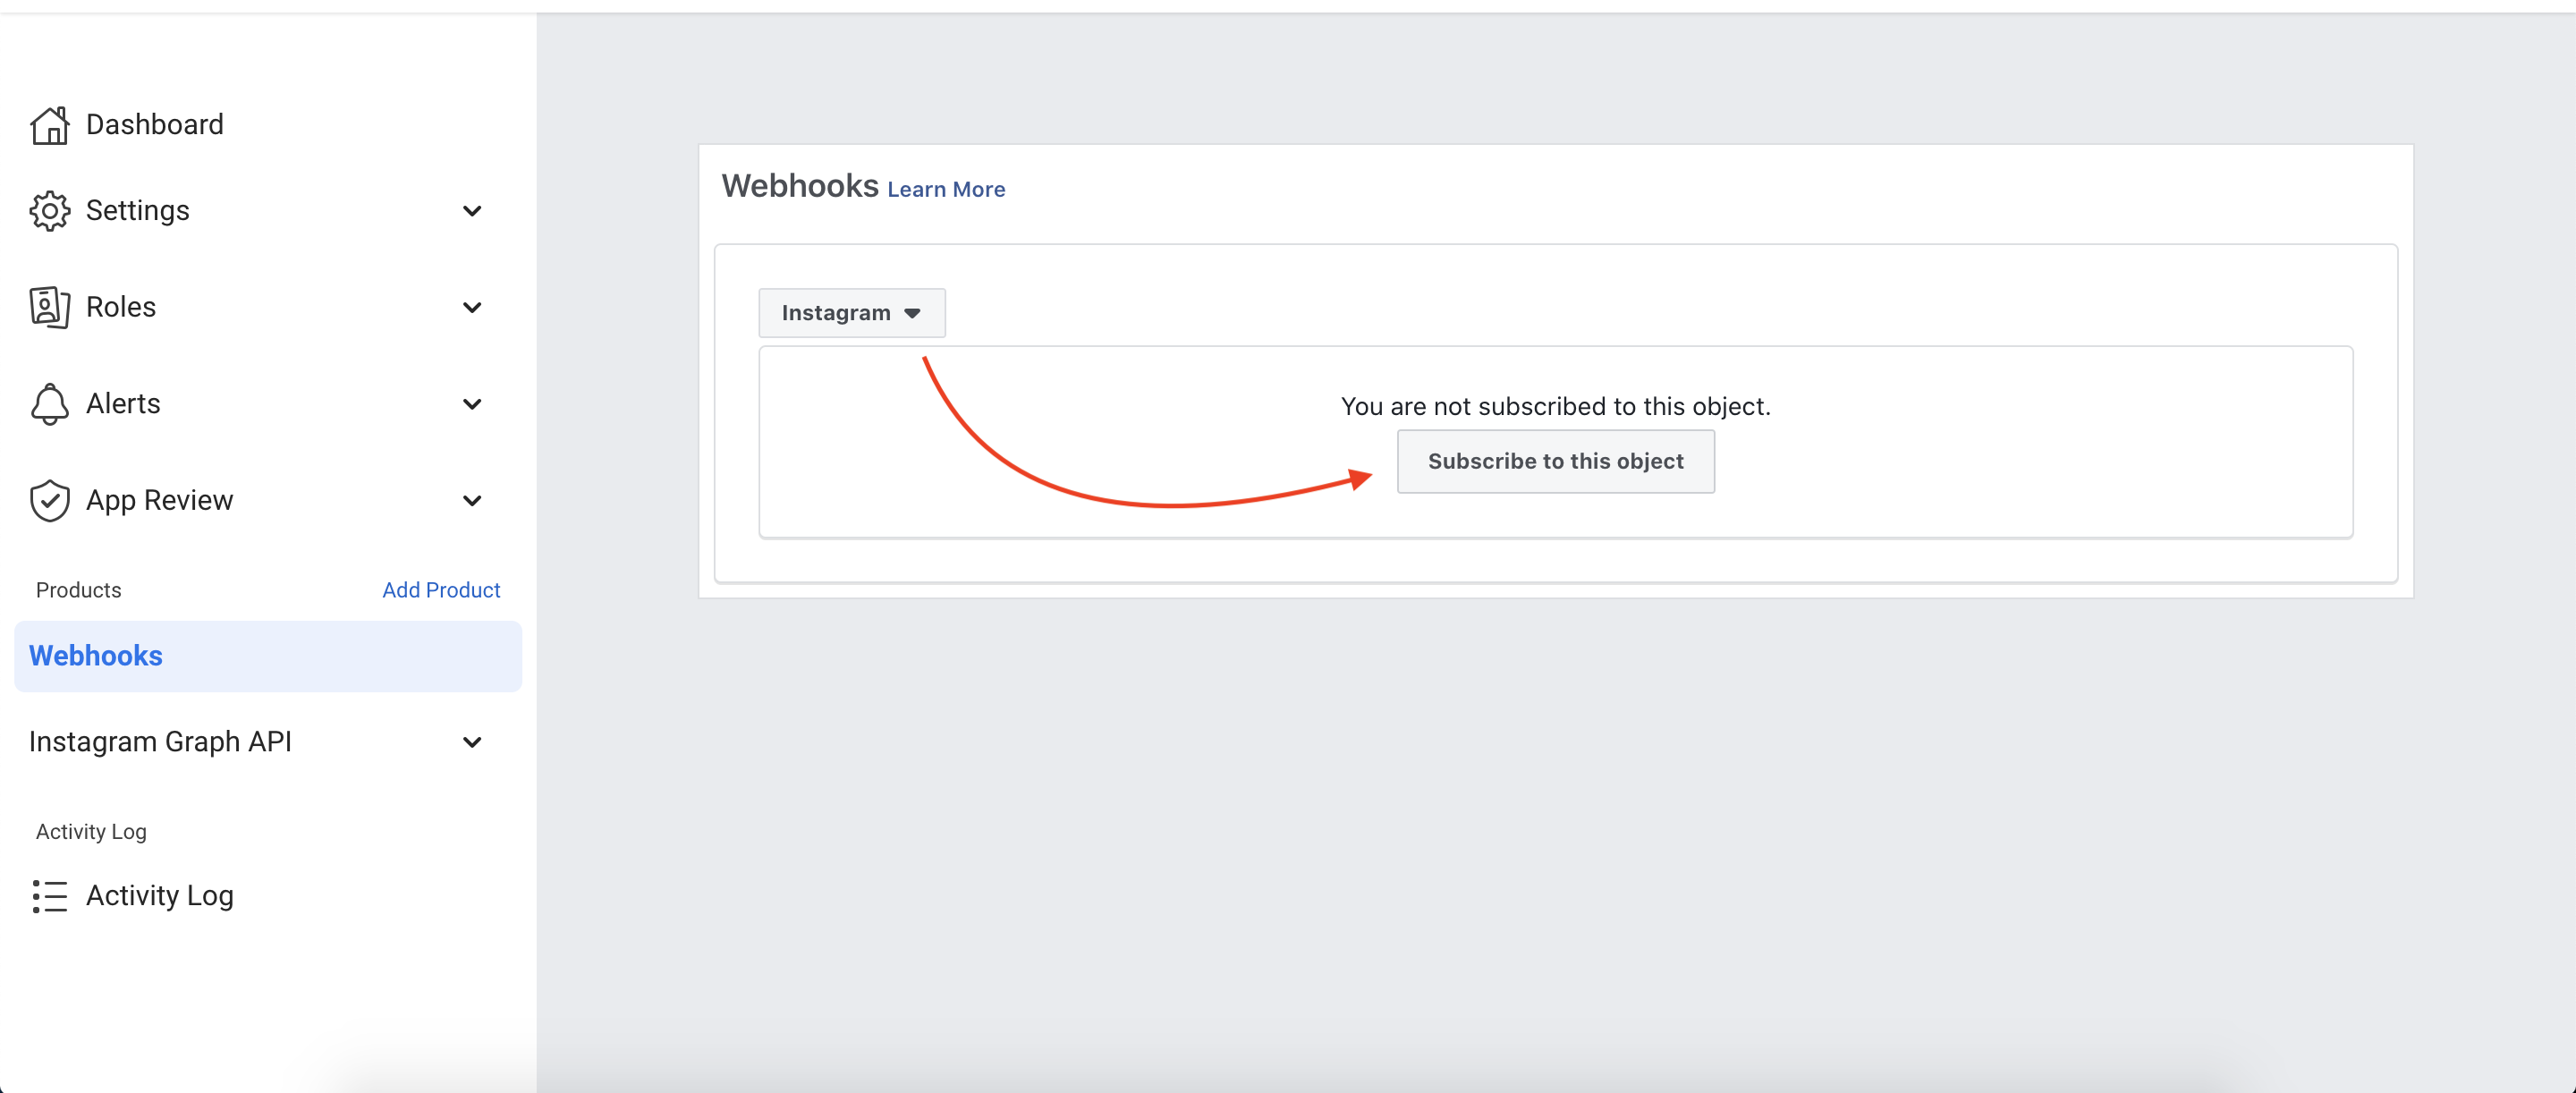
Select Instagram from the dropdown (the default is User) and click on the button Subscribe to this object.
This will open a modal box: Add your Callback URL (your instance's Facebook Webhook URL) and verify token (the webhookSecret you added in your airy.yaml file in the previous step). After this is done you will see a list of events, where you need to subscribe to messages.
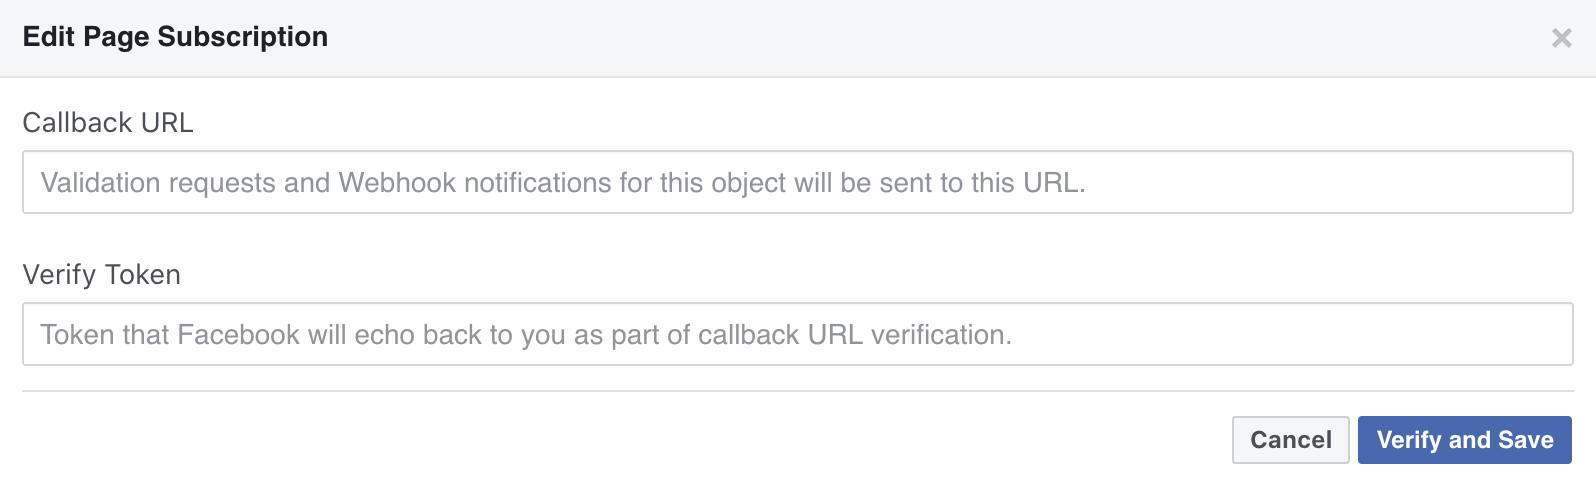
Your Facebook Webhook URL should have the following format:
https://your-public-fqdn/facebook
or if you are using Ngrok:
https://RANDOM_STRING.tunnel.airy.co/facebook
If you encounter errors, please make sure the verify token matches the
webhookSecret in your airy.yaml file and that your variables have been
configured successfully in your Airy Core instance.
Refer to the Configuration Docs on how to input these values.
Once the verification process is complete, Facebook will immediately start sending events to your Airy Core instance.
Step 3: Enable the Instagram Graph API
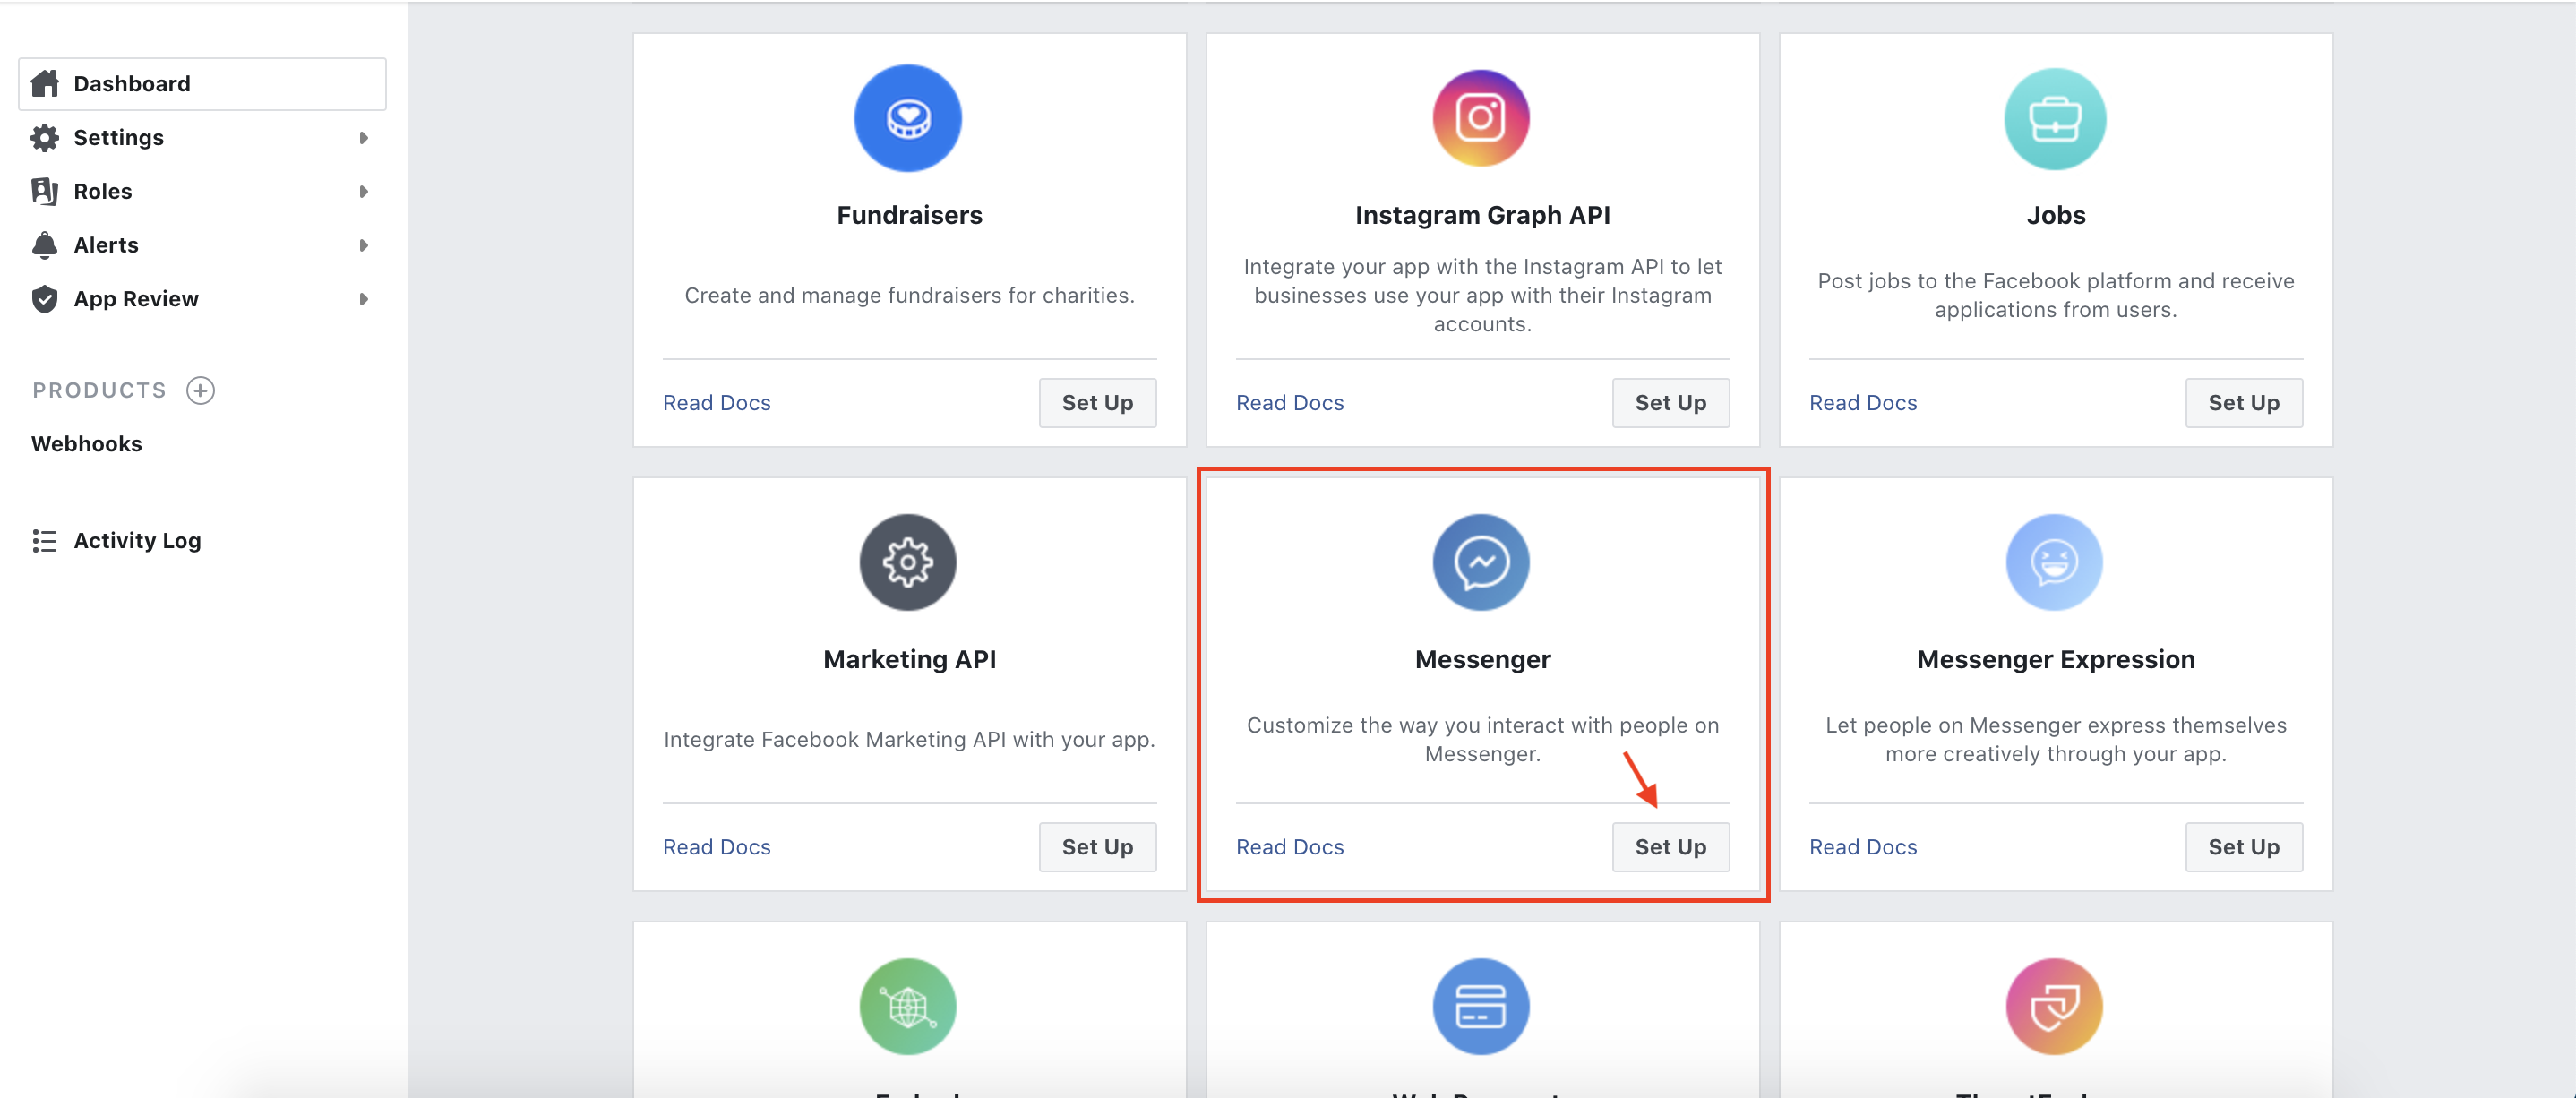
To allow Airy to access names and profile pictures you need to enable the Instagram API. To do so go to the Products page and click the Set Up button on the Instagram Graph API product card.
Step 4: Obtain the Page token
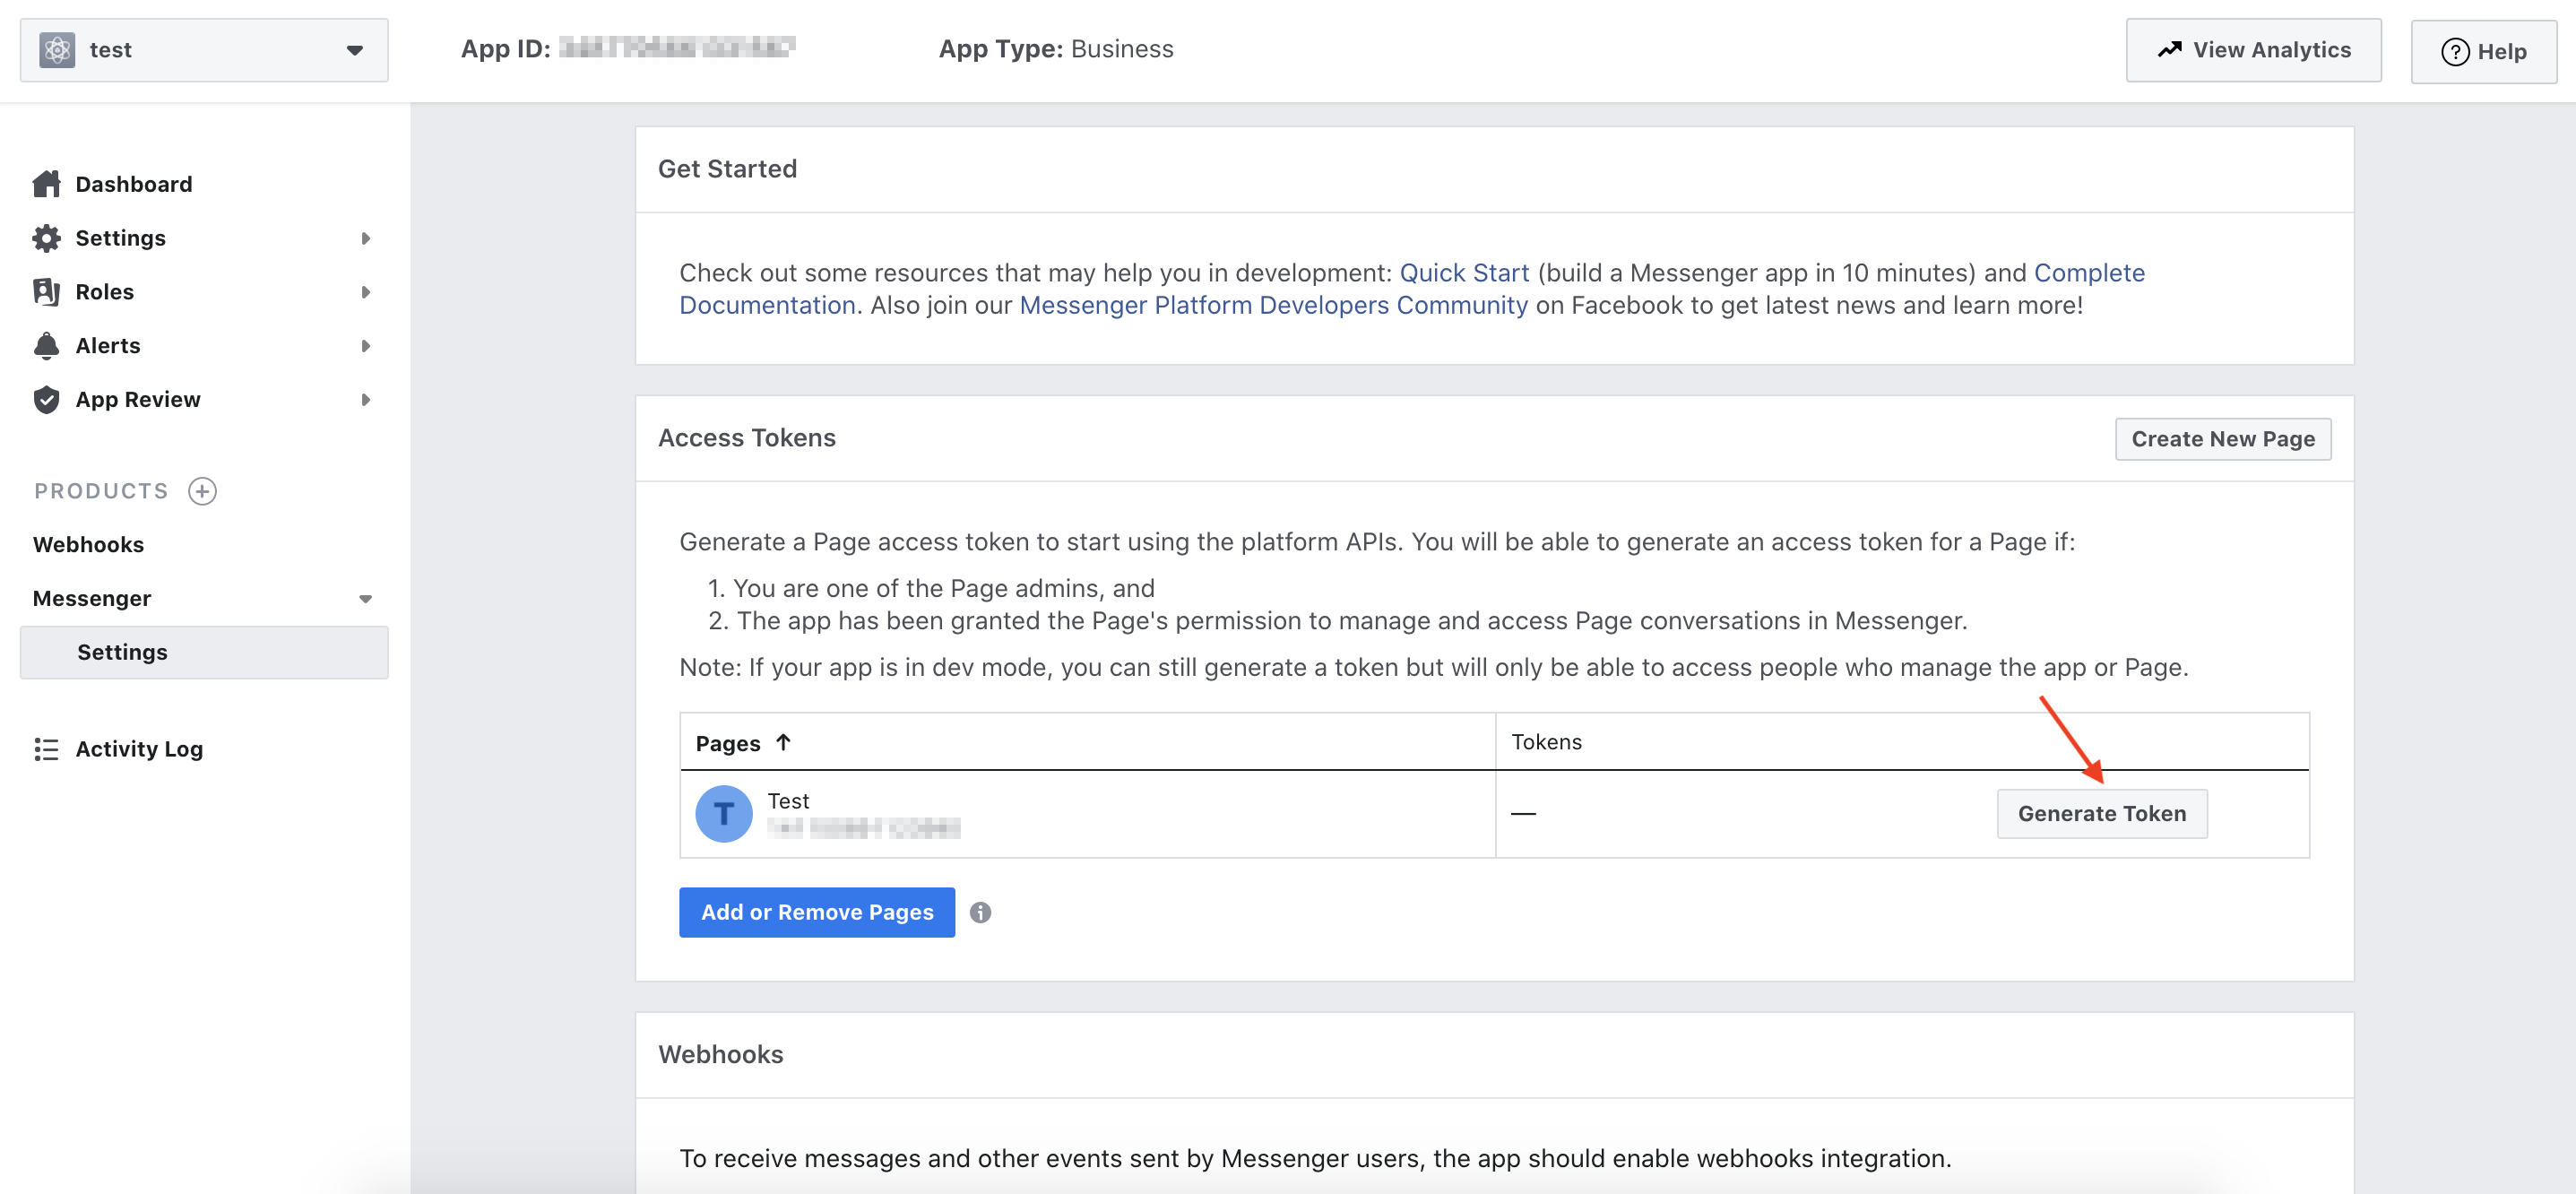
Go to the Products page (click on the + icon next to Products on the left sidebar).
Next click the Set Up button on the Messenger product card.
This will add Messenger as one of your app's products and will lead you to the Messenger product page.
Notice that at the bottom of the page, the Webhooks product has been added with the variables you gave at the previous step.

Click on the blue button Add or Remove Pages and select your page. Next, scroll up, and click on the button Generate Token.
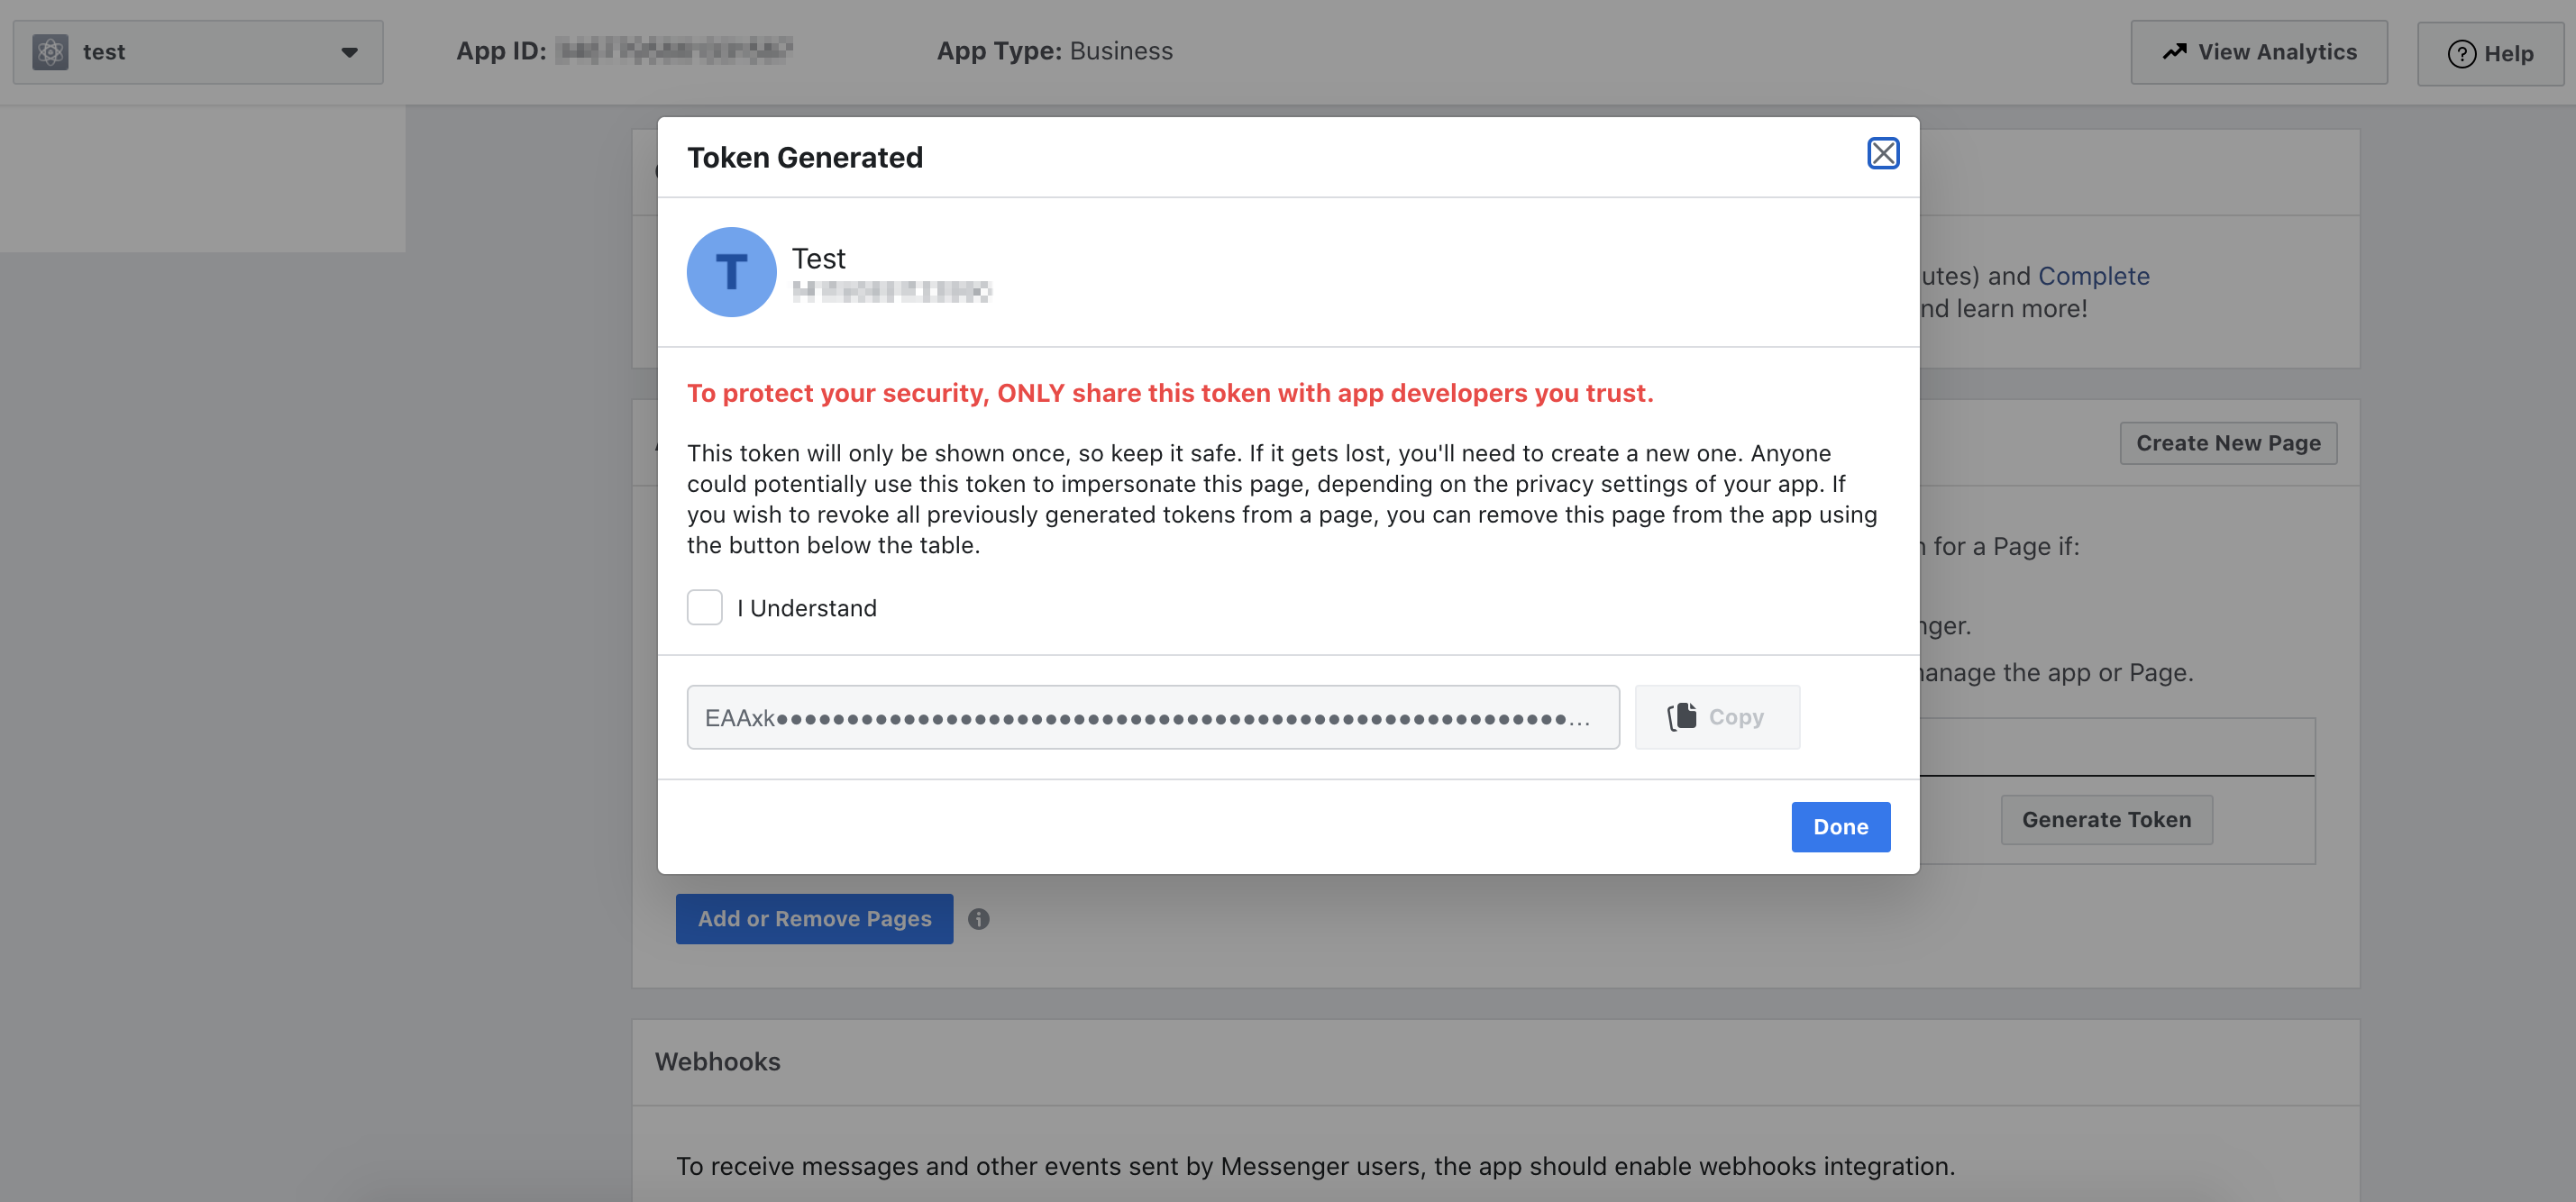
This will open a pop-up revealing your Page access token. Copy it! You will need it to connect the instagram account to your instance.
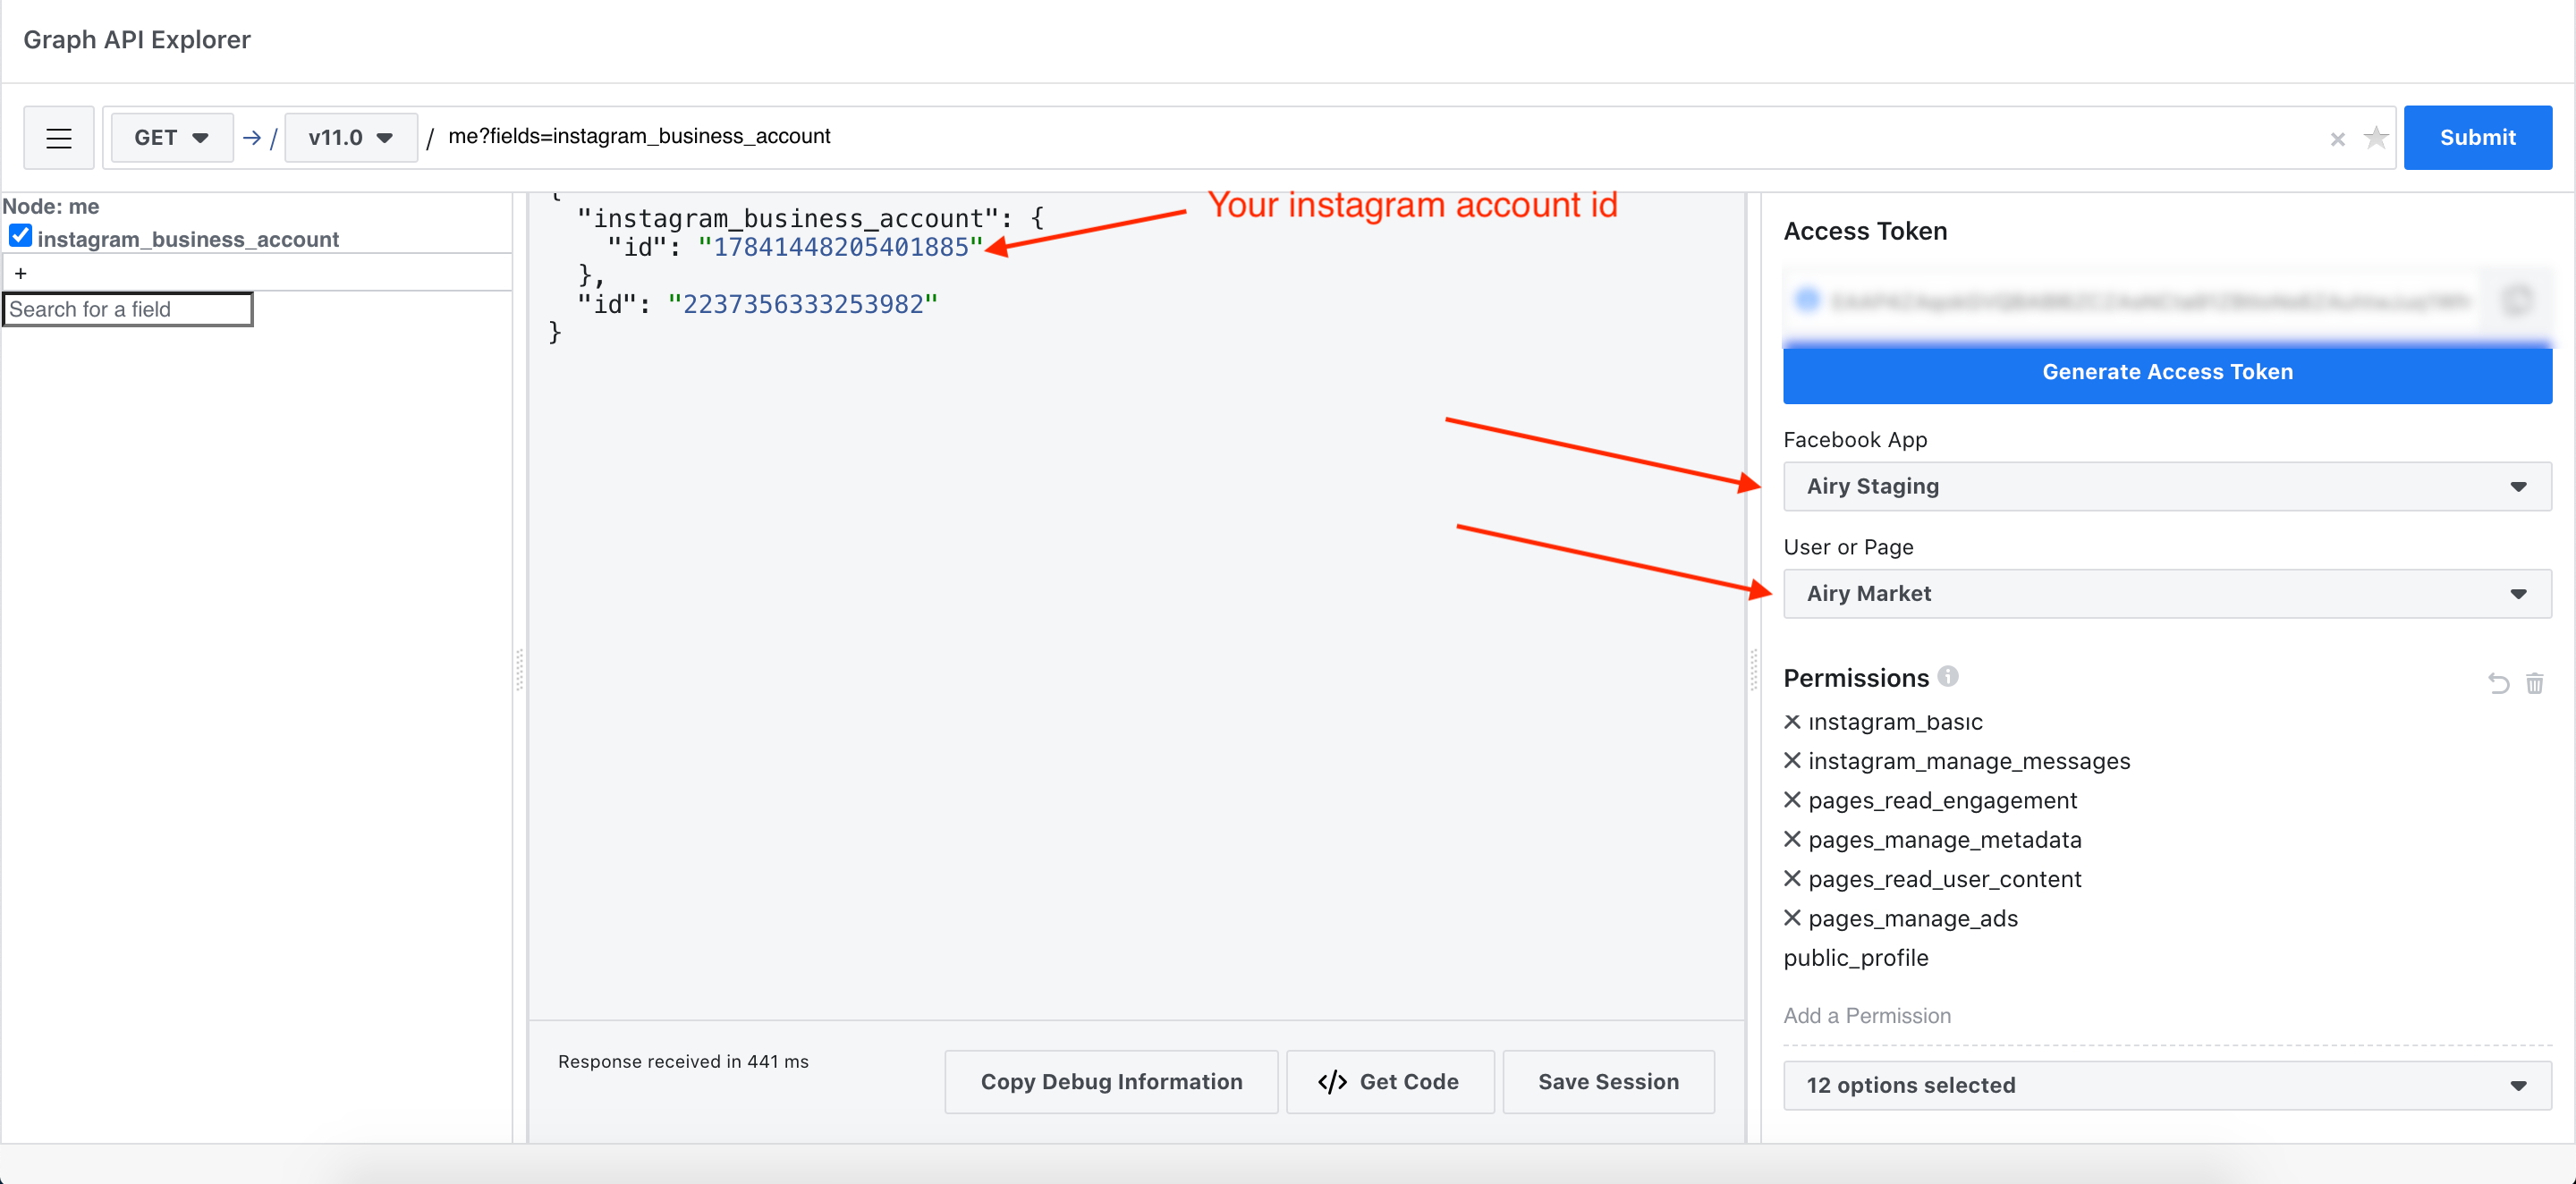
Step 5: Get the Instagram account ID
To connect your account you will also need the ID (not the username) of your Instagram Business account. To get it you can click on this link to run a prepared query against the Facebook Graph API. Make sure to either select your Page and App or to use the Page token you acquired in step 4.
Success! You are now ready to connect an Instagram Account to your Airy Core instance 🎉
Step 6: Connect an Instagram channel
There are 2 options to connect this connector's channel to your instance:
- you can send an API request (using curl or an API platform such as Postman)
- you can use the Control Center UI to connect and manage the channel in just a few clicks
We cover both options in this section.
Connect an Instagram channel via API request
To connect an Instagram channel via API request, send a request to the channels endpoint to connect an instagram account to your instance.
Channels endpoint
Connect an instagram account to your Airy Core instance via the channels endpoint
Connects an Instagram account to Airy Core.
POST /channels.instagram.connect
page_idis ID of the Facebook page connected to the Instagram accountpage_tokenis the Access Token of the Facebook pageaccount_idis the ID of the Instagram accountnameis the custom name for the connected pageimage_url(optional) is the custom image URL
Sample request
{
  "page_id": "fb-page-id-1",
  "account_id": "ig-account-id",
  "page_token": "authentication token",
  "name": "My custom name for this account",
  "image_url": "https://example.org/custom-image.jpg" // optional
}
Sample response
{
  "id": "channel-uuid-1",
  "source": "instagram",
  "source_channel_id": "ig-account-id",
  "metadata": {
    "name": "My custom name for this account",
    // optional
    "image_url": "https://example.org/custom-image.jpg"
  }
}
Troubleshooting:
Make sure the credentials you have added to the airy.yaml file (refer back to step 1) have been applied to your Airy Core instance.
Verify your webhook integration (refer back to step 2). Make sure your Facebook Webhook URL has been correctly added on your app's dashboard. You should edit the 'Instagram' subscriptions for the Webhooks and Messenger product each time you create a new instance. Make sure that you have selected 'Instagram' subscription and not 'User' (which is the default).
Connect an Instagram channel via the UI
You can also connect an Instagram channel via your Airy Core instance Control Center UI.
On your instance's Control Center, click on 'Catalog' on the left sidebar menu and select 'Instagram'.
This will open a page with a form.
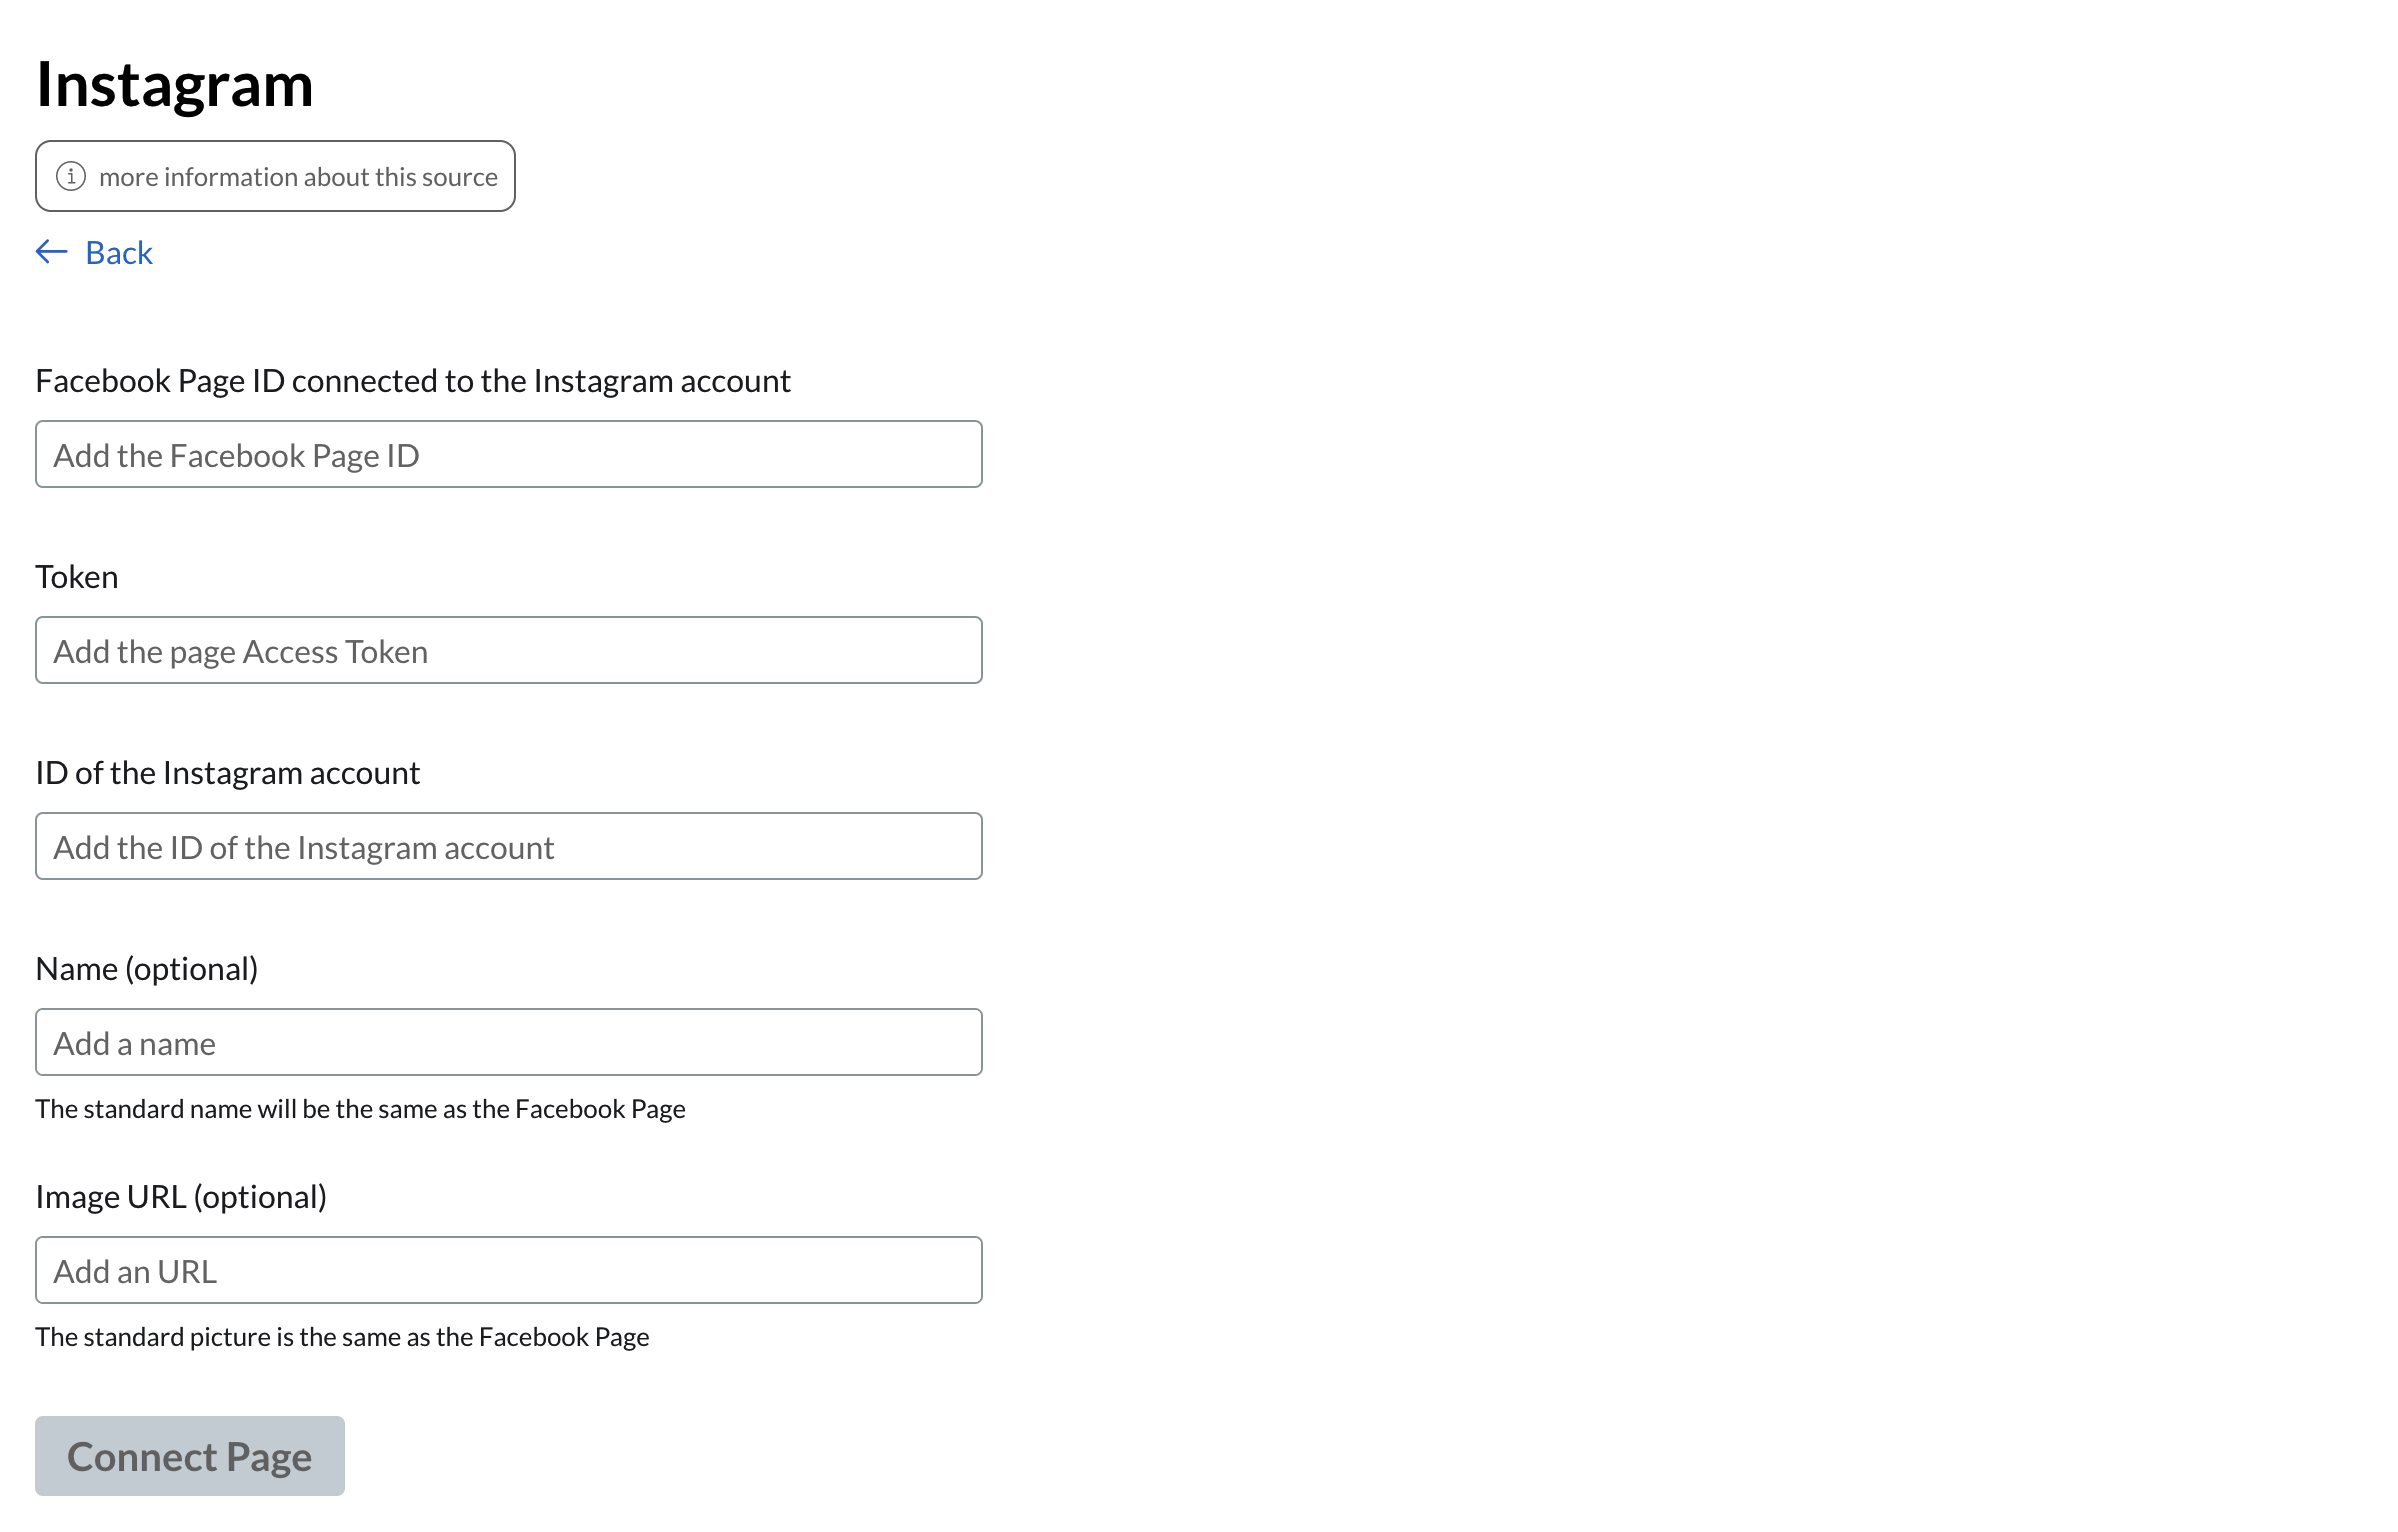
Add your Page ID, Token, and the ID of your Instagram account.
You can optionally add a name and an image. The display name will be used as the conversation's name while the image URL will be used as its icon in the Inbox UI's messenger. A fallback image will be used if you do not enter a valid image URL.
Next, click on the 'Save' button.
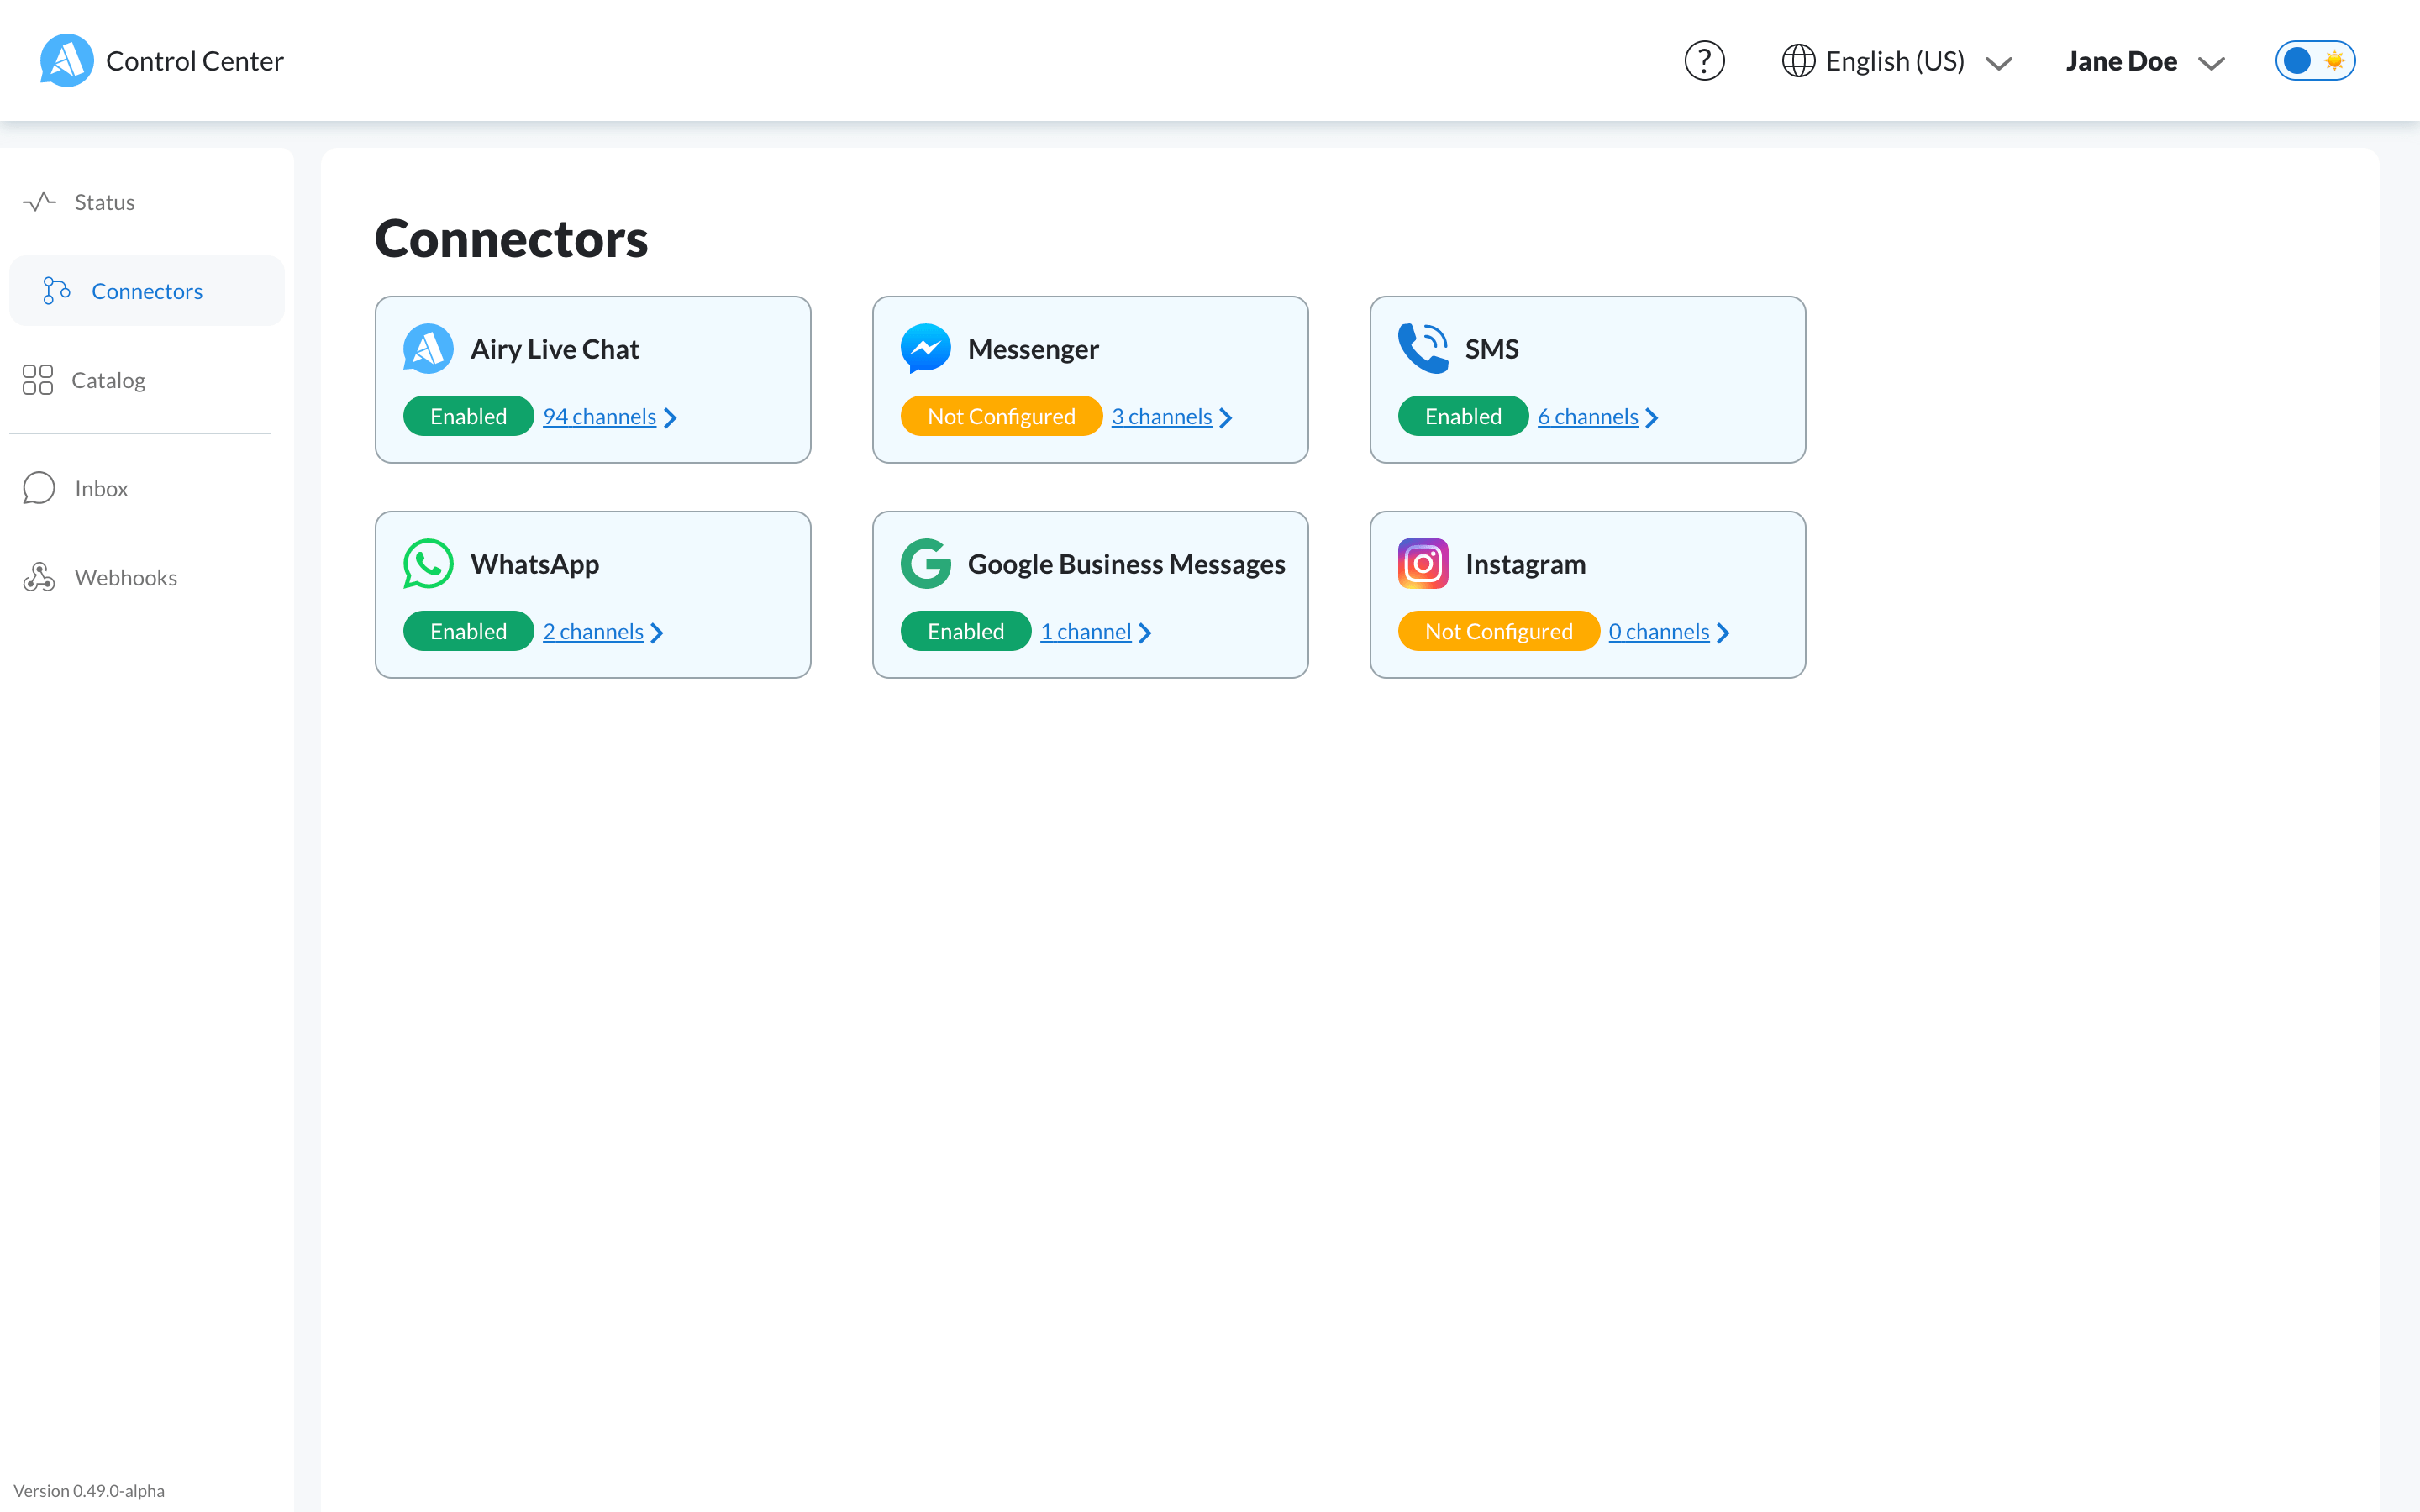
Upon successful connection, Instagram will appear as connected in the Connectors page in your app's Control Center.
You can edit its configuration at any time by selecting 'Instagram' in the list.
Step 7: Send a message to Instagram
To test this you can now send a message to your Instagram account using the Instagram app or web interface.
Send and receive messages with the Inbox UI
Now that you connected this source to your instance and started a conversation, you can see the conversations, messages, and templates in the Airy Inbox, and use it to respond to the messages.
Inbox
Receive messages from different sources and send messages using the Inbox UI