WhatsApp via Twilio
Connect with 2 billion WhatsApp users via messages and templates.
The Twilio WhatsApp source provides a channel for sending and receiving WhatsApp messages using the Twilio API.
- The required steps to configure the Twilio WhatsApp source
- How to connect a Twilio WhatsApp source to Airy Core
The WhatsApp via Twilio source is not enabled by default.
You need to add configuration in your airy.yaml file and apply it to activate it.
Twilio is a communication platform specialized in phone services. Airy Core supports Twilio as a provider of 2 different sources: Twilio WhatsApp and Twilio SMS. The Twilio provider requires the following configuration:
- Step 1: Configuration
- Step 2: Connect a Twilio provider to your instance
- Step 3: Send and receive messages with the Inbox UI
Let's proceed step by step.
First, to connect a Twilio provider to your Airy Core instance, you must have a Twilio account and a phone number. If this is not your case: head over to Twilio's website, create an account and buy a phone number.
Step 1: Configuration
Then, you need to request access to enable your Twilio number for WhatsApp by completing the request form on Twilio's website. To request access, you need to have a Facebook Business Manager ID: read Twilio's documentation for more information on the request process.
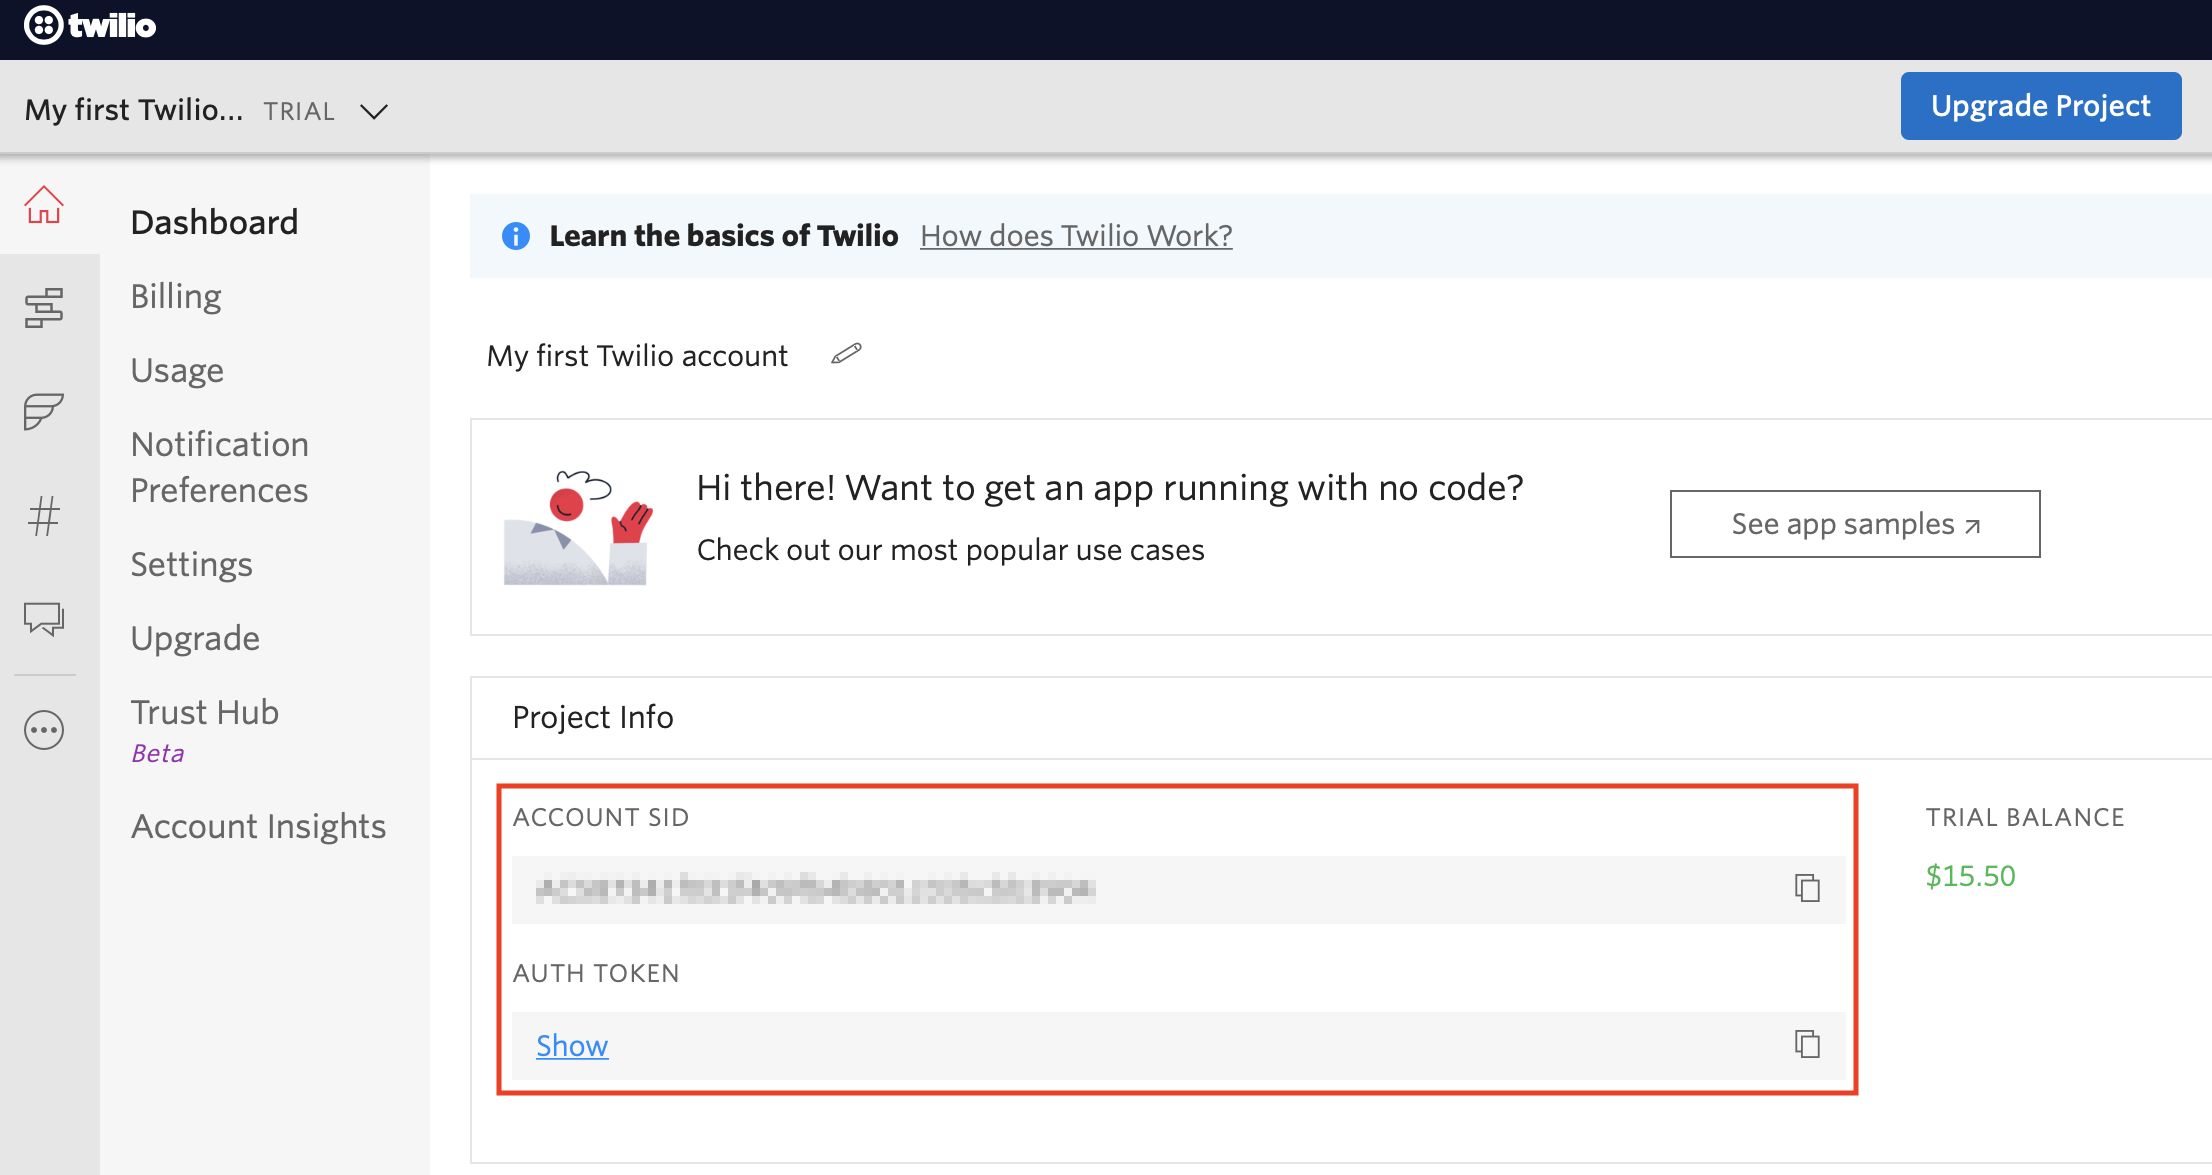
Find the authToken and accountSid
Once you have a Twilio account, log in and find your Twilio auth token account SID on your Twilio dashboard (underlined in red in the screenshot below).
https://www.twilio.com/console
Copy and paste your Auth token and Account Sid as strings next to authToken: and accountSid:, below components/sources/twilio in your airy.yaml file.
Make sure the Auth token and Account Sid are contained within a pair of either single quotation marks '' or double quotation marks ""
and paste the tokens as they are (do not add or remove additional spaces).
Refer to the Configuration Docs on how to input these values.
Configure the webhook integration
After editing the airy.yaml configuration file, create an Airy Core instance.
You are now ready to configure the Webhook.
On the Twilio dashboard, open the left menu sidebar and go to the Phone numbers section.
Select the phone number that you want to use and copy and paste your Twilio Webhook URL as the Webhook URL of your phone number (in 'Messaging', below 'A MESSAGE COMES IN' - 'Webhook' should be selected from the dropdown).
https://www.twilio.com/console/phone-numbers

Your Twilio Webhook URL should have the following format:
https://your-public-fqdn/twilio
or if you are using Ngrok:
https://RANDOM_STRING.tunnel.airy.co/twilio
Success! You are now ready to connect a Twilio.WhatsApp source to your Airy Core instance 🎉
Step 2: Connect a Twilio provider to your instance
There are 2 options to connect this connector's channel to your instance:
- you can send an API request (using curl or an API platform such as Postman)
- you can use the Control Center UI to connect and manage the channel in just a few clicks
We cover both options in this section.
Connect Twilio.WhatsApp via API request
You connect connect a Twilio.WhatsApp source by sending a request to the Channels endpoint.
Channels endpoint
Connect a Twilio.WhatsApp source to your Airy Core instance through the Channels endpoint
POST /channels.twilio.whatsapp.connect
phone_numberThe phone number as listed in your Twilio dashboard. It must not have spaces and must include the country code.nameis the custom name for the connected phone numberimage_urlis the custom image URL
Sample request
{
  phone_number: '+491234567',
  name: 'WhatsApp Marketing',
  image_url: 'https://example.com/custom-image.jpg', // optional
}
Sample response
{
  id: 'channel-uuid-1',
  metadata: {name: 'WhatsApp Marketing', image_url: 'https://example.com/custom-image.jpg'},
  source: 'twilio.whatsapp',
  source_channel_id: 'whatsapp:+491234567',
  connected: true,
}
Connect Twilio.WhatsApp via the UI
You can connect a Twilio.WhatsApp channel via your Airy Core instance Control Center UI.
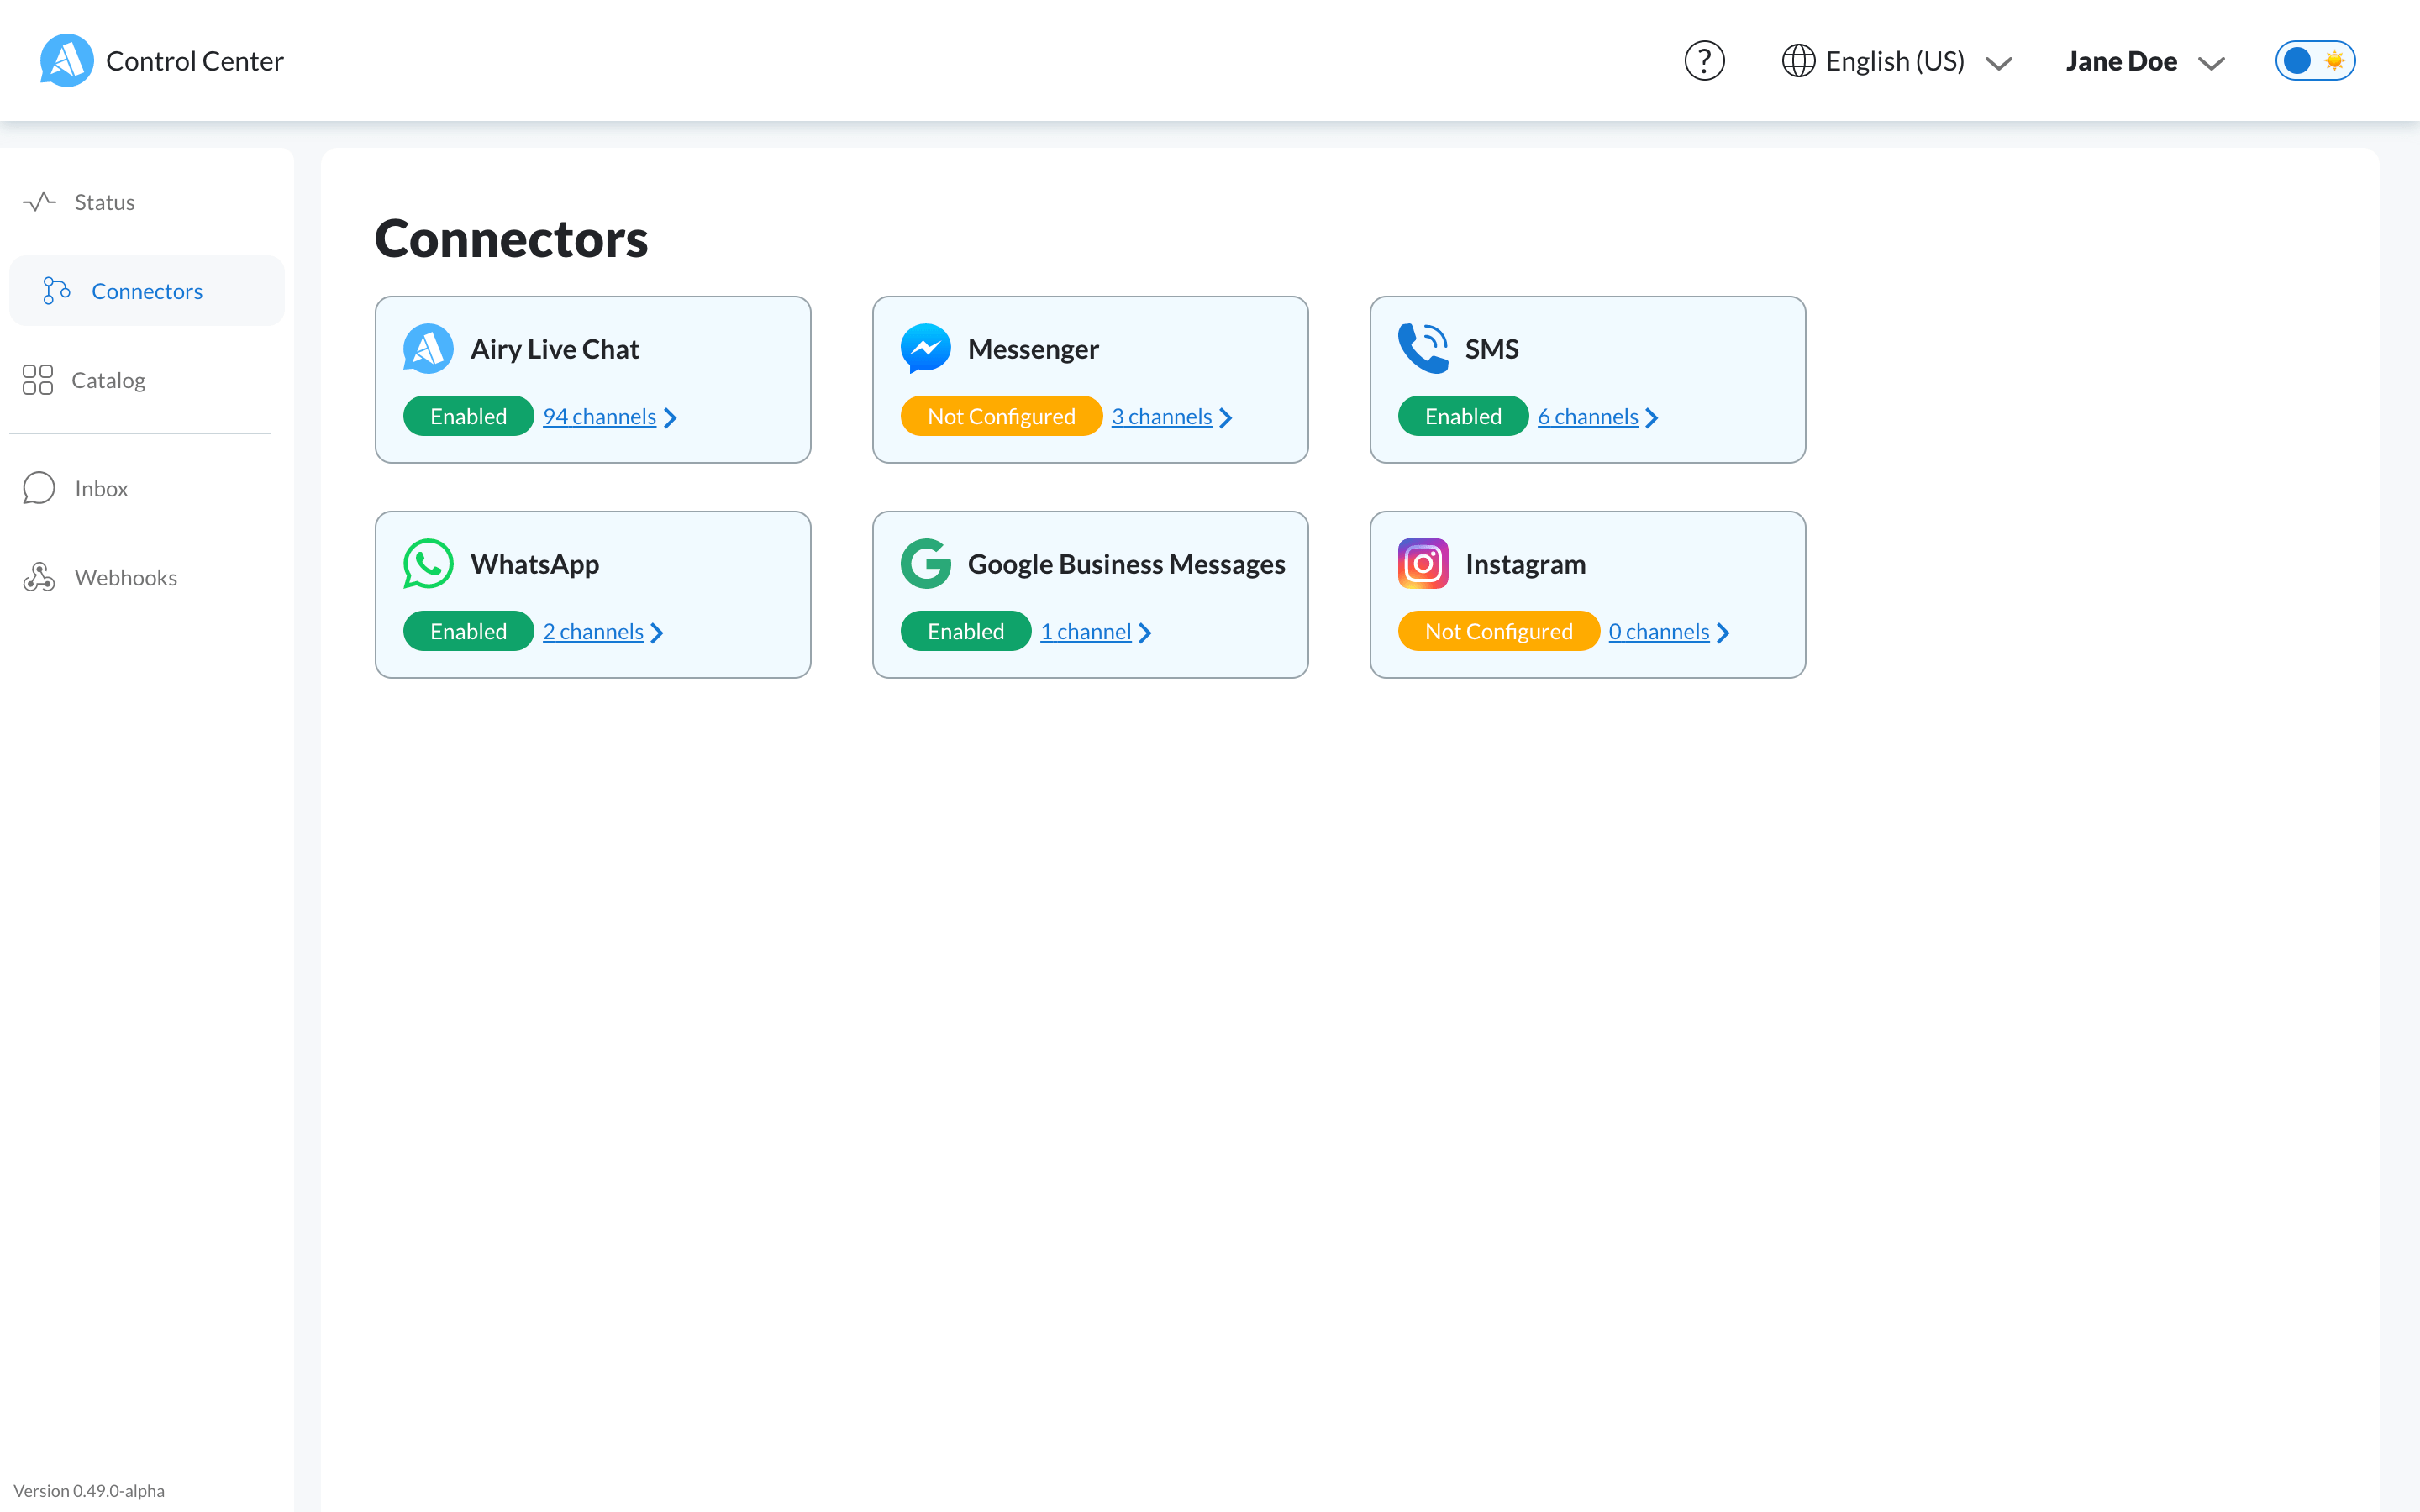
On your instance's Control Center, click on 'Catalog' on the left sidebar menu and select 'WhatsApp'.
This will open a page with a form.

Add your Twilio phone number in the respective field.
You can optionally add a name and an image. The display name will be used as the conversation's name while the image URL will be used as its icon in the Inbox UI's messenger. A fallback image will be used if you do not enter a valid image URL.
Upon successful connection, Twilio.WhatsApp will appear as connected in the Connectors page in your app's Control Center.
You can edit its configuration at any time by selecting 'WhatsApp' in the list.
Step 3: Send and receive messages with the Inbox UI
After connecting the source to your instance, it's time to create a conversation between your Airy Core instance, and a Twilio.Whatsapp source.
Send a text message (Whatsapp) from a mobile phone to the Twilio phone number you have used. This will create a conversation: a Twilio.Whatsapp conversation will appear in the Inbox UI's messenger with the text message you have sent.
If the channel has been successfully connected, but the message you sent does not appear in a conversation and a conversation is not created, please see below for debugging advice.
If you encounter errors, please follow this debugging advice:
make sure that the authToken and accountSid tokens you have added to the airy.yaml file (refer back to step 1) have been applied to your Airy Core instance. An Airy Core instance should be created after editing the airy.yaml file.
verify your webhook integration (refer back to step 2). Make sure that your Twilio Webhook URL has been correctly added to your phone number in your Twilio dashboard (check for typos). The Webhook URL should be added in the 'Messaging', 'Incoming Message' section.
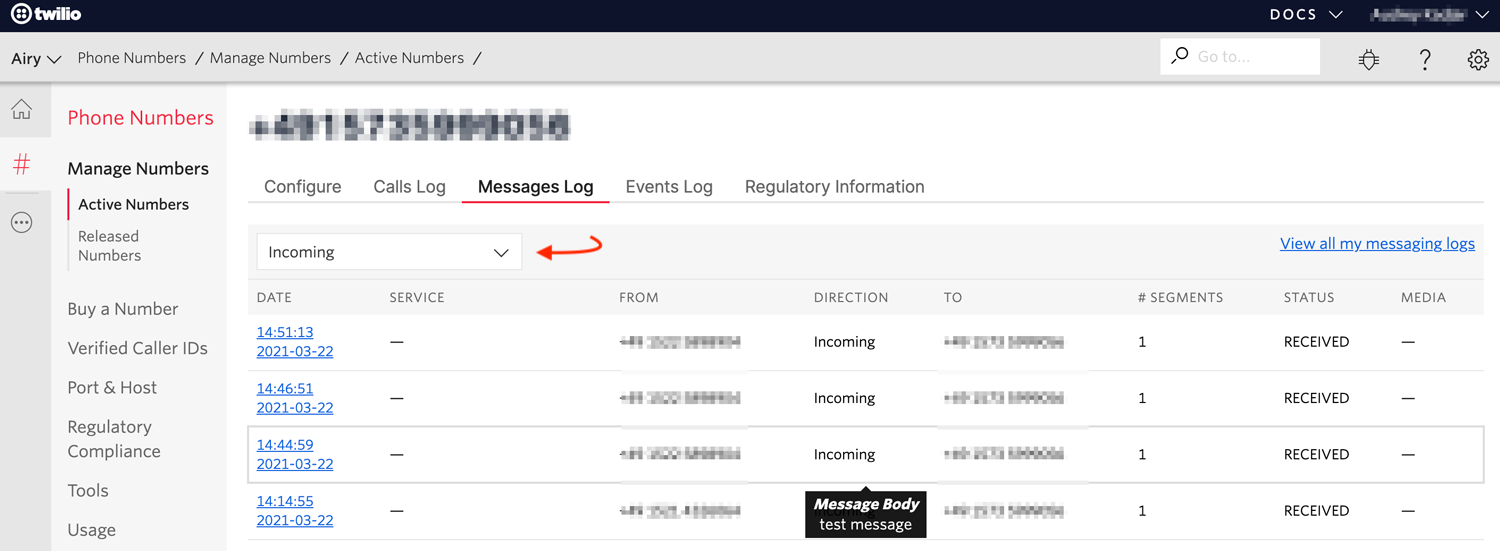
check the messaging logs in your Twilio dashboard (see screenshot below): select your phone number from the phone numbers list, click on the Messaging Logs tab, and select Incoming from the dropdown. The error codes from the logs are precious hints of API errors' causes.
https://www.twilio.com/console/phone-numbers/instance/INSTANCE_STRING
Once a conversation has been successfully created, you will be able to send messages through the Messages endpoint.
Messages endpoint
Send messages to your Airy Core instance from different sources through the Messages endpoint
Sending a text message
{
  "conversation_id": "a688d36c-a85e-44af-bc02-4248c2c97622",
  "message": {
    "Body": "Hello World"
  }
}
Sending media
To send media you need to enable MMS for your phone number.
{
  "conversation_id": "a688d36c-a85e-44af-bc02-4248c2c97622",
  "message": {
    "MediaUrl": "https://picsum.photos/"
  }
}